 Kia Optima: Receiver-Drier. Repair procedures
Replacement
| 1. | Remove the condenser, and then
remove the bottom cap (B) with L wrench (A) from the condenser.
|
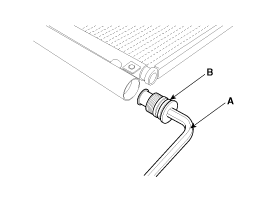
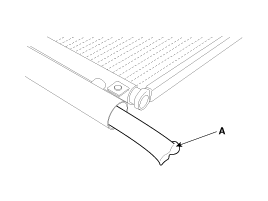
| 2. | Remove the desiccant (A) from
condenser using a long nose plier. Check for crumbled desiccant and clogged
bottom cap filter.
|
| 3. | Apply air conditioning compressor oil along the O-rings and threads of the new bottom cap. |
| 4. | Insert the new desiccant into the receiver drier tank. The desiccant must be sealed in vacuum before it is exposed to air for use. |
| 5. | Install the new bottom cap to
the condenser.
|
 Replacement
1.
Recover the refrigerant with
a recovery/ recycling/ charging station.
2.
Disconnect the negative (-) battery
terminal.
3.
Remove the discharge line ...
 A/C Pressure Transducer. Components and Components Location
Component Location
...
See also:
Seatback angle
Push the control switch forward or backward to move the seatback to the desired
angle. Release the switch once the seat reaches the desired position. ...
Checking Cables And Wires
1.
Check the terminal for
tightness.
2.
Check terminals and wires
for corrosion from battery electrolyte, etc.
3.
Check terminals and wire ...
To Reset at a Faster Speed
1. Push the RES/ACCEL switch and hold it.
2. Accelerate to desired speed and release the RES/ACCEL switch. While the switch
is pressed, the vehicle will gradually gain speed. ...
Categories
Kia Optima Manuals
- Kia Optima DL3 2019-2026 Owners Manual
- Kia Optima DL3 2019-2026 Service and Repair Manual
- Kia Optima TF 2011-{2019} Owners Manual
- Kia Optima TF 2011-2026 Service Manual
- Kia Optima MS/Magentis 2000-2005 Owners Manual

Copyright ® www.kiopman.com 2026