 Kia Optima: Replacement
| 1. |
Recover the refrigerant with
a recovery/ recycling/ charging station. |
| 2. |
Disconnect the negative (-) battery
terminal. |
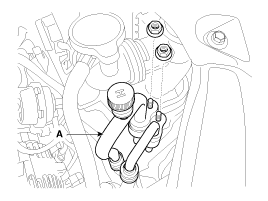
| 3. |
Remove the discharge line and
liquid line (A) from the condenser.
Tightening torque :
3.9~5.8 N.m(0.4~0.6Kgf.m, 2.9~4.3 Ib-ft)
|
|
Plug or cap the lines immediately after disconnecting them to avoid
moisture and dust contamination. |
|
| 4. |
Disconnect the mounting clip,
and then remove the air duct hose assembly (A).
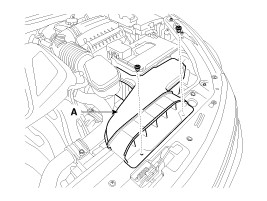
|
| 5. |
Loosen the radiator bracket mounting
bolts (A).
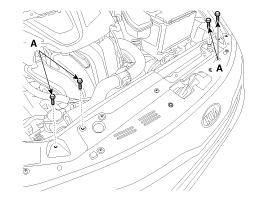
|
| 6. |
Remove the radiator fan. (Refer
to EM group - ŌĆ£RadiatorŌĆØ)
|
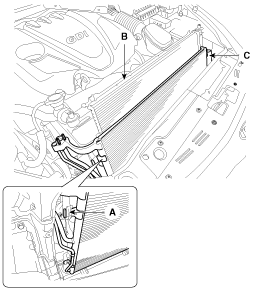
| 7. |
Disconnect the pin (A) and then
remove the condenser (C) from radiator (B).
|
| 8. |
Install in the reverse order
of removal, and note these items :
| A. |
If you're installing
a new condenser, add refrigerant oil ND-OIL8. |
| B. |
Replace the O-rings with
new ones at each fitting, and apply a thin coat of refrigerant oil
before installing them. Be sure to use the right O-rings for R-134a
to avoid leakage. |
| C. |
Be careful not to damage
the radiator and condenser fins when installing the condenser. |
| D. |
Be sure to install the
lower mount cushions of condenser securely into the holes. |
| E. |
Charge the system, and
test its performance. |
|
1.
Check the condenser fins for
clogging and damage. If clogged, clean them with water, and blow them with
compressed air. If bent, gently bend them using a screwdriver or pliers.
...
Replacement
1.
Remove the condenser, and then
remove the bottom cap (B) with L wrench (A) from the condenser.
Tightening torque :20~25N.m
(2.0~2.5kgf.m, 14.5~18.2lb-ft) ...
 Inspection
 Receiver-Drier. Repair procedures