 Kia Optima: Removal and Installation
| 1. |
Disconnect the battery negative terminal first, then
the positive terminal.
|
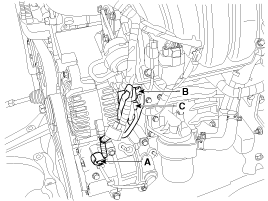
| 2. |
Disconnect the A/C compressor switch connector (A)
the alternator connector (B), and the cable from alternator "B" terminal
(C).
|
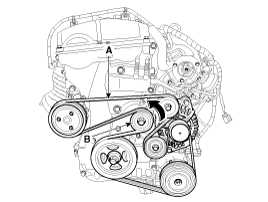
| 3. |
Remove the drive belt (A) after turning the drive
belt tensioner (B) counterclockwise.
|
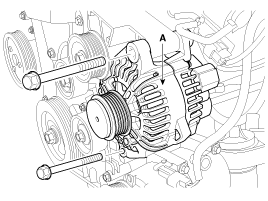
| 4. |
Pull out the through bolt and then remove the alternator
(A).
|
| 5. | Installation is the reverse order of removal. |

 Disassembly
1.
Remove the alternator cover (A) using a screw driver
after loosening the nuts (B).
2.
Remove the slip ring guide (A) and then loosen the
...
See also:
Chart 4
...
Removal
1.
Turn the ignition switch OFF and disconnect the negative
(-) battery cable.
2.
Disconnect the accelerator position sensor connector
(A).
...
Climate Control Air Filter. Repair procedures
Replacement
1.
Disconnect the damper (B) from
the glove box (A).Remove the glove box lift (C).
2.
Remove the filter cover with
pushing the knob.
...
Categories
Kia Optima Manuals
- Kia Optima DL3 2019-2026 Owners Manual
- Kia Optima DL3 2019-2026 Service and Repair Manual
- Kia Optima TF 2011-{2019} Owners Manual
- Kia Optima TF 2011-2026 Service Manual
- Kia Optima MS/Magentis 2000-2005 Owners Manual

Copyright ® www.kiopman.com 2026