 Kia Optima: Disassembly
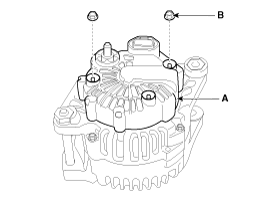
| 1. |
Remove the alternator cover (A) using a screw driver
after loosening the nuts (B).
|
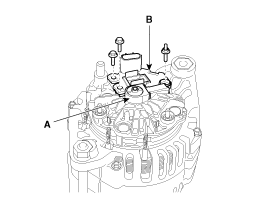
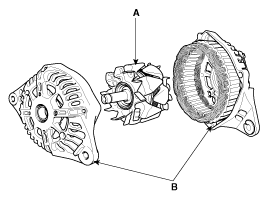
| 2. |
Remove the slip ring guide (A) and then loosen the
mounting bolts and disconnect the brush holder assembly (B).
|
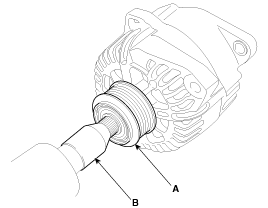
| 3. |
Remove the pulley (A) using the SST (09373-27000)
(B).
|
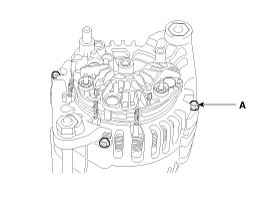
| 4. |
Loosen the 4 through bolts (A).
|
| 5. |
Disconnect the rotor (A) and cover (B).
|
| 6. | Reassembly is the reverse order of disassembly. |
 Removal and Installation
1.
Disconnect the battery negative terminal first, then
the positive terminal.
Tightening torque
:(+) terminal : 7.8 ~ 9.8N.m (0.8 ~ 1.0kgf.m,
5.8 ~ 7.2l ...
 Inspection
Inspect Rotor
1.
Check that there is continuity between the slip rings
(C).
2.
Check that there is no continuity between the slip
...
See also:
Tire Size Designation
A tireŌĆÖs sidewall is marked with a tire size designation. You will need this
information when selecting replacement tires for your car. The following explains
what the letters and numbers in the ...
Replacement
1.
Remove the rear wheel & tire.
Tightening torque:88.3
~ 107.9 N.m(9.0 ~ 11.0kgf.m, 65.1 ~ 79.6lb-ft)
...
Consumer Assistance
Roadside Assistance is provided on all new 2006 model Kia Vehicles from the date
the vehicle is delivered to the first retail buyer or otherwise put into use (in-service
date), whichever is earlie ...
Categories
Kia Optima Manuals
- Kia Optima DL3 2019-2026 Owners Manual
- Kia Optima DL3 2019-2026 Service and Repair Manual
- Kia Optima TF 2011-{2019} Owners Manual
- Kia Optima TF 2011-2026 Service Manual
- Kia Optima MS/Magentis 2000-2005 Owners Manual

Copyright ® www.kiopman.com 2026