 Kia Optima: Seat Heater (Non-Air Ventilation). Repair procedures
Inspection
First Seat Heater
| 1. |
Check for continuity and measure
the resistance between No.4 and No.6 terminals. [Cushion]
No.
|
Description
|
No.
|
Description
|
1
|
Heater (-)
|
3
|
NTC (+)
|
2
|
NTC (-)
|
4
|
Heater (+)
|
[Back]
|
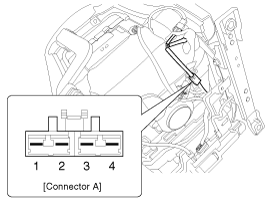
| 2. |
Measure the resistance between
No.1 and No. 4 in the A connector to check the cushion and back heater.
Standard valueSet (Cushion+Back)
: 2.65Ω ┬▒ 10%
|
|
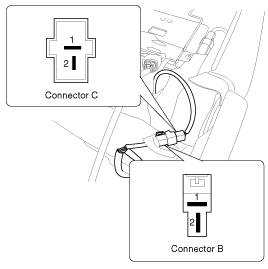
| 3. |
Measure the resistance between
No.4 in the A and No. 1 in the B connector to check the cushion heater.
Standard valueCushion :
1.3Ω ┬▒ 10%
|
|
| 4. |
Measure the resistance between
No.1 and No. 2 in the C connector to check the back heater.
Standard valueBack : 1.35Ω
┬▒ 10%
|
|
| 5. |
Operate the seat heater after
connecting the connector, and then check the thermostat by measuring the
temperature of seat surface.
Standard value (Fabric / Leather)
Cushion :
1 Step : 40 ┬▒ 2┬░C(104 ┬▒ 3.6┬░F)2 Step : 42 ┬▒ 2┬░C(107.6 ┬▒ 3.6┬░F)
Back :1 Step : 46 ┬▒ 2┬░C(114.8 ┬▒ 3.6┬░F)
2 Step : 52 ┬▒ 2┬░C(125.6 ┬▒ 3.6┬░F)
|
|
Rear Seat Heater
| 1. |
Check for continuity and measure
the resistance between terminals as below.
※ Refer to the "Circuit Diagram" to check the connector B and C. |
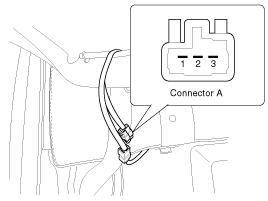
| 2. |
Measure the resistance between
No.1 and No. 2 in the A connector to check the cushion and back heater.
Standard valueSet (Cushion+Back)
- Bench type : 2.90Ω ┬▒ 10%
Cushion - Split type : 8.0Ω ┬▒ 10%
|
|
| 3. |
Measure the resistance between
No.3 in the A and No. 1 in the B connector to check the cushion heater.
Standard valueCushion -
Bench type : 2.2Ω ┬▒ 10%
|
|
| 4. |
Measure the resistance between
No.1 and No. 2 in the C connector to check the back heater.
Standard valueBack - Bench
type : 1.7Ω ┬▒ 10%
|
|
| 5. |
Operate seat warmer after connecting
the 4P connector, and then check the thermostat by measuring the temperature
of seat surface.
Standard value (Fabric / Leather)
Cushion :
1 Step : 40 ┬▒ 2┬░C(104 ┬▒ 3.6┬░F)2 Step : 42 ┬▒ 2┬░C(107.6 ┬▒ 3.6┬░F)
Back :1 Step : 46 ┬▒ 2┬░C(114.8 ┬▒ 3.6┬░F)
2 Step : 52 ┬▒ 2┬░C(125.6 ┬▒ 3.6┬░F)
|
|
See also:
Components - 1 [ General ]
1. Headrest
2. Headrest guide
3. Rear seat back cover
4.Rear seat back frame assembly
5. Rear back armrest board
6. Rear seat cushion cover
7. Rear back armres ...
Transaxle Ranges
P (Park)
Always come to a complete stop before shifting into P. This position locks the
transaxle and prevents the front wheels from rotating. Always come to a complete
stop before shifting into ...
Inhibitor Switch. Description and Operation
Description
Inhibitor Switch monitors the lever's position(PRND) and is used to control gear
setting signals.
...
 Seat Heater (Non-Air Ventilation). Schematic Diagrams
