 Kia Optima: Replacement
Hood Assembly Replacement
| ā¢ |
When removing and installing
the hood, an assistant is necessary. |
| ā¢ |
Be careful not to damage
the hood and body. |
| ā¢ |
When removing the clips,
use a clip remover. |
|
| 1. |
Using a screwdriver, lift the
socket clips (A) up slightly on both ends of the lifter (B).
|
| 2. |
After loosening the hood hinge
(A) mounting bolts, remove the hood panel (B).
Tightening torque :
21.6~26.5 N.m (2.2~2.7 kgf.m, 15.9~19.5 lb-ft)
|
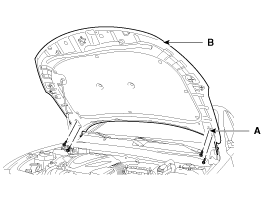
|
| 3. |
Installation is the reverse of
removal.
| ā¢
|
Make sure the
hood locks/unlocks and opens/closes properly. |
| ā¢
|
Adjust the hood
alignment. |
|
|
Hood Insulator Pad Replacement
| 1. |
Using a clip remover, detach
the clips, and remove the hood insulator pad (A).
| ā¢
|
Be careful not
to scratch the hood panel. |
|
|
| 2. |
Installation is the reverse of
removal.
| ā¢
|
Replace any damaged
clips. |
|
|
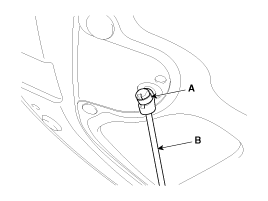
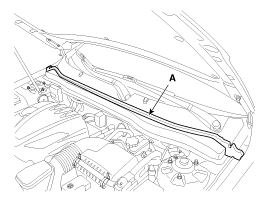
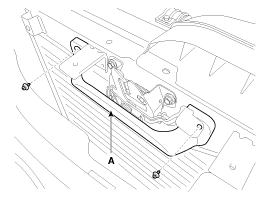
Hood Lift Replacement
| 1. |
Using a screwdriver (A), lift
the socket clips (B) up slightly on both ends of the lifter (C), and then
remove the lifter from the bracket (D).
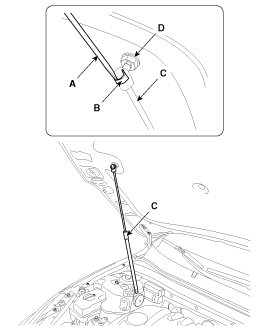
|
| 2. |
Installation is the reverse of
removal. |
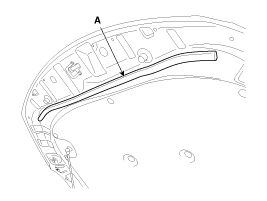
Hood Seal Weatherstrip Replacement
| 1. |
Detach the clips, then remove
the hood seal weatherstrip (A).
| ā¢
|
Be careful not
to scratch the hood seal weatherstrip. |
|
|
| 2. |
Installation is the reverse of
removal.
| ā¢
|
Replace any damaged
clips. |
|
|
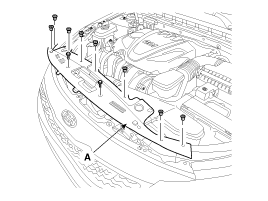
Hood Weatherstrip Replacement
| 1. |
Remove the hood weatherstrip
(A).
|
| 2. |
Installation is the reverse of
removal. |
Hood Release Handle Replacement
| 1. |
Using a screwdriver or remover,
remove the hood release handle (A).
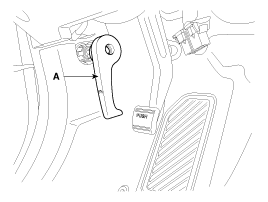
|
| 2. |
Installation is the reverse of
removal.
| ā¢
|
Make sure the
hood latch cable is connected properly. |
| ā¢
|
Make sure the
hood locks/unlocks and opens/closes properly. |
|
|
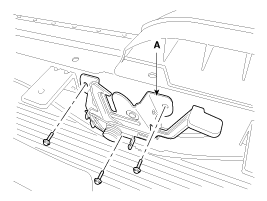
Hood Latch Replacement
| 1. |
After loosening the mounting
clips and bolts, then remove the rediator upper cover (A).
|
| 2. |
Detach the clips, then remove
hood latch cover (A).
|
| 3. |
Remove the hood latch (A) mounting
bolts.
Tightening torque :
7.8 ~ 11.8N.m (0.8 ~ 1.2kgf.m, 5.8 ~ 8.7 lb-ft)
|
|
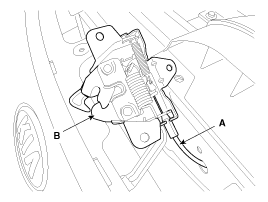
| 4. |
Disconnect the hood latch cable
(A) and remove the hood latch (B).
|
| 5. |
Installation is the reverse of
removal.
| ā¢
|
Make sure the
hood latch release cable is connected properly. |
| ā¢
|
Make sure the
hood locks/unlocks and opens/closes properly. |
| ā¢
|
Adjust the latch
alignment. |
|
|
Adjust Hood
1.
After loosening the hinge (A)
mounting bolt, adjust the hood (B) by moving it up or down, or right or
left.
2.
Adjust the hood height by turning
the ...
See also:
Driving in the Rain
Rain and wet roads can make driving dangerous, especially if youāre not prepared
for the slick pavement. Here are a few things to consider when driving in the rain:
A heavy rainfall will make ...
Rail Pressure Sensor (RPS). Description and Operation
Description
Rail Pressure Sensor (RPS) is installed on the delivery pipe
and measures the instantaneous fuel pressure in the delivery pipe. The sensing
element (Semiconductor element) built in ...
Removal
Refer to "High Pressure Fuel Pump" in this group.
...

 Adjustment