 Kia Optima: Rear Seat Belt. Repair procedures
Replacement
Rear Seat Belt Replacement
| ŌĆó |
When installing the belt,
make sure not to damage the retractor. |
|
| 1. |
Remove the following items first.
| A. |
Rear seat assembly
(Refer to the BD group - "Rear Seat")
|
| B. |
Rear Pillar trim (Refer
to the BD group - "Interior Trim")
|
| C. |
Package tray trim (Refer
to the BD group - "Interior Trim")
|
|
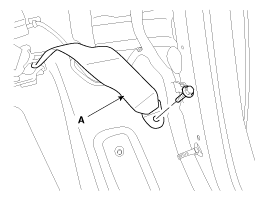
| 2. |
After loosening the mounting
bolt, then remove the rear seat belt lower anchor (A).
Tightening torque :39.2
~ 53.9 N.m (4.0 ~ 5.5 kgf.m, 28.9 ~ 39.8 lb-ft)
|
|
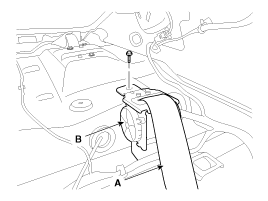
| 3. |
After loosening the retractor
(B) mounting bolt, then remove the rear seat belt (A).
Tightening torque :39.2
~ 53.9 N.m (4.0 ~ 5.5 kgf.m, 28.9 ~ 39.8 lb-ft)
|
|
| 4. |
Installation is the reverse of
removal.
| ŌĆó
|
Replace any damaged
clips. |
|
|
Rear Seat Belt Buckle Replacement
| 1. |
Remove the rear seat cushion.
(Refer to the BD group - "Rear Seat")
|
| 2. |
Loosen the mounting bolt, and
then remove the rear seat belt buckle (A).
Tightening torque :39.2
~ 53.9 N.m (4.0 ~ 5.5 kgf.m, 28.9 ~ 39.8 lb-ft)
|
[LH]
![[RH]](images/books/1521/stfbd1224d.gif)
[RH]

|
| 3. |
Installation is the reverse of
removal. |
Replacement
Front Seat Belt Replacement
ŌĆó
When installing the belt,
make sure not to damage the pretensioner.
...
See also:
Disassembly
1.
Disassemble the CVVT assembly
(A) and camshaft (B).
When removing the CVVT assembly bol ...
Installation
ŌĆó
Install the component with the specified
torques.
ŌĆó
Note that internal d ...
Replacement
1.
Disconnect the negative (-) battery
terminal.
2.
Loosen the mounting bolts and
then remove the under cover (A).
3.
Disconnect the connector ...
 Front Seat Belt. Repair procedures
