 Kia Optima: Front Seat Belt. Repair procedures
Replacement
Front Seat Belt Replacement
| ŌĆó |
When installing the belt,
make sure not to damage the pretensioner. |
|
| 1. |
Remove the following items first
:
| A. |
Front seat assembly
(Refer to the BD group - "Front Seat")
|
| B. |
Front door scuff trim
& rear door scuff trim (Refer to the BD group - "Interior Trim")
|
|
| 2. |
Disconnect the battery negative
cable, and wait for at least three minutes before beginning work. |
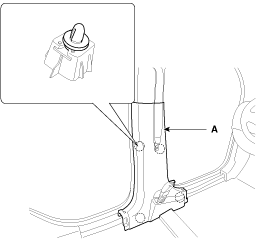
| 3. |
To remove the seat belt anchor
pretensioner (C), keep on pushing the lock pins (A) as arrow direction.
And then remove the seat belt after pushing the lock pin (B).

|
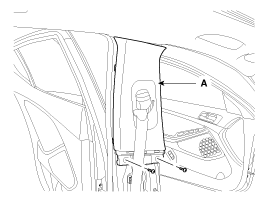
| 4. |
Remove the center pillar lower
trim (A).
|
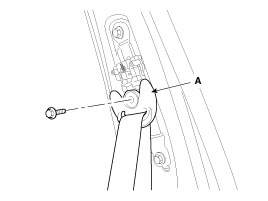
| 5. |
After loosening the mounting
screws, then remove the center pillar upper trim (A) .
|
| 6. |
After loosening the mounting
bolt, then remove the front seat belt upper anchor (A).
Tightening torque :
39.2 ~ 53.9 N.m (4.0 ~ 5.5 kgf.m, 28.9 ~ 39.8 lb-ft)
|
|
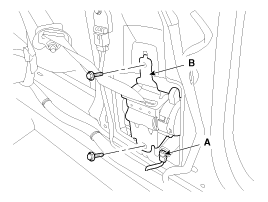
| 7. |
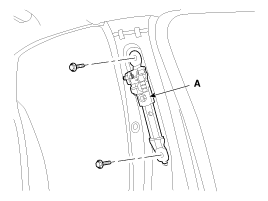
After disconnecting the pretensioner
connector lock pin, remove the seat belt pretensioner connector (A), loosen
the mounting bolts, then remove the pretensioner (B).
Tightening torque :39.2
~ 53.9 N.m (4.0 ~ 5.5 kgf.m, 28.9 ~ 39.8 lb-ft)
|
|
| 8. |
Installation is the reverse of
removal. |
Height Adjust Replacement
| 1. |
Remove the following items first
:
| A. |
Front seat assembly
(Refer to the BD group - "Front Seat")
|
| B. |
Front door scuff trim
& Rear door scuff tirm (Refer to the BD group - "Interior Trim")
|
| C. |
Front seat belt lower
anchor |
| D. |
Center pillar lower trim
(Refer to the BD group - "Interior Trim")
|
| E. |
Center pillar upper trim
(Refer to the BD group - "Interior Trim")
|
| F. |
Front seat belt upper
anchor |
|
| 2. |
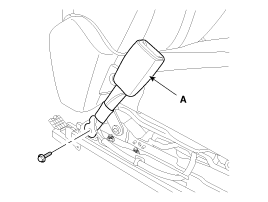
After loosening the bolts, then
remove the height adjustor (A).
Tightening torque :39.2
~ 53.9 N.m (4.0 ~ 5.5kgf.m, 28.9 ~ 39.8 lb-ft)
|
|
| 3. |
Installation is the reverse of
removal.
| ŌĆó
|
Replace any damaged
clips. |
| ŌĆó
|
Make sure the
height adjusts properly. |
|
|
Front Seat Belt Buckle Replacement
| 1. |
Remove the front seat assembly.
(Refer to the BD group - "Front Seat")
|
| 2. |
After loosening the mounting
bolt, then remove the front seat belt buckle (A).
Tightening torque :39.2
~ 53.9 N.m (4.0 ~ 5.5 kgf.m, 28.9 ~ 39.8 lb-ft)
|
|
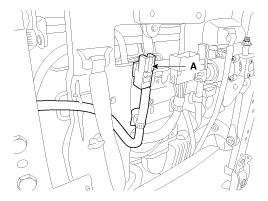
| 3. |
Disconnect the connector mounting
clip (A).
|
| 4. |
Installation is the reverse of
removal. |
Components
1. Front seat belt
2. Height adjuster
3. Rear seat belt [RH]
4. Rear center seat belt
5. Rear seat belt [LH]
6. Rear seat belt buckle
...
Replacement
Rear Seat Belt Replacement
ŌĆó
When installing the belt,
make sure not to damage the retractor.
...
See also:
Window opening and closing
Type A
The driverŌĆÖs door has a master power window switch that controls all the windows
in the vehicle.
To open or close a window, press down or pull up the front portion of the corresponding ...
Warnings and indicators
All warning lights are checked by turning the ignition switch ON (do not start
the engine). Any light that does not illuminate should be checked by an authorized
Kia dealer.
After starting the en ...
Illuminated Ignition Switch
Whenever a door is opened, the ignition switch will be illuminated for your convenience.
The light will go off approximately 30 seconds after closing the door or when the
ignition key is inserted ...
 Components and Components Location
 Rear Seat Belt. Repair procedures