 Kia Optima: Interior Trim. Repair procedures
Replacement
Door Scuff Trim Replacement
| ŌĆó |
Put on gloves to protect
your hands. |
| ŌĆó |
Use a plastic panel removal
tool to remove interior trim pieces to protect from marring the
surface. |
| ŌĆó |
Take care not to bend
or scratch the trim and panels. |
|
| 1. |
Using a screwdriver or remover,
remove the front door scuff tirm (A). [Front]
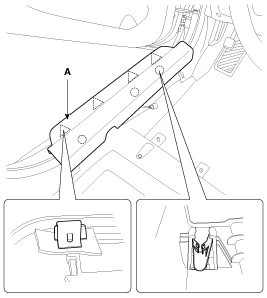
|
| 2. |
Remove the rear seat cushion.
(Refer to the BD group - "Rear Seat")
|
| 3. |
After loosening the mounting
screw, then remove rear door scuff trim (A). [Rear]
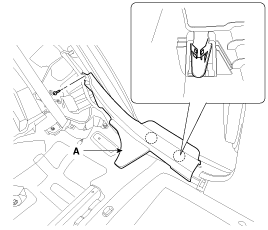
|
| 4. |
Installation is the reverse of
removal.
| ŌĆó
|
Replace any damaged
clips. |
|
|
Front Pillar Trim Replacement
| ŌĆó |
Put on gloves to protect
your hands. |
| ŌĆó |
Use a plastic panel removal
tool to remove interior trim pieces to protect from marring the
surface. |
| ŌĆó |
Take care not to bend
or scratch the trim and panels. |
|
| 1. |
Remove the front pillar trim.
| (1) |
To remove the front pillar
trim, the below tool (A) must be used.
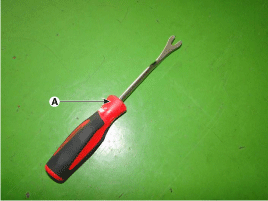
|
| (2) |
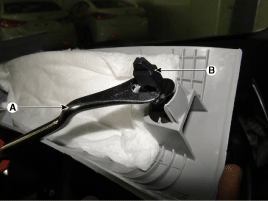
Slightly spread open
the front pillar trim and then place the tool (A) on the mounting
clip (B) like the picture below. After placing the tool (A) on
the mounting clip (B) push it to the front.
|
ŌĆó |
Once
the front pillar trim has been removed, replace
the clips to new ones. |
|
|
| (3) |
Remove the front pillar
trim (A).
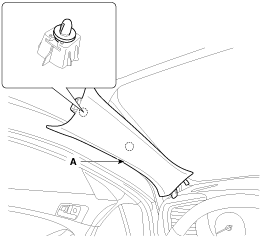
|
ŌĆó |
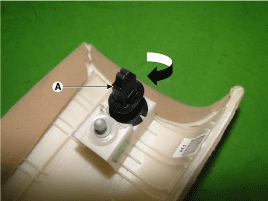
Remove
the mounting clip (A) by turning it clockwise.
|
|
|
|
| 2. |
Installation is the reverse of
removal. |
Cowl Side Trim Replacement
| ŌĆó |
Put on gloves to protect
your hands. |
| ŌĆó |
Use a plastic panel removal
tool to remove interior trim pieces to protect from marring the
surface. |
| ŌĆó |
Take care not to bend
or scratch the trim and panels. |
|
| 1. |
Remove the front door scuff trim. |
| 2. |
Remove the hood latch release
handle. (Refer to the BD group - "Hood")
|
| 3. |
Detach the clips, then remove
the cowl side trim (A).
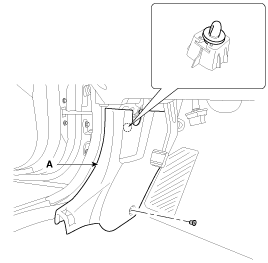
|
| 4. |
Installation is the reverse of
removal.
| ŌĆó
|
Replace any damaged
clips. |
|
|
Center Pillar Trim Replacement
| ŌĆó |
Put on gloves to protect
your hands. |
| ŌĆó |
Use a plastic panel removal
tool to remove interior trim pieces to protect from marring the
surface. |
| ŌĆó |
Take care not to bend
or scratch the trim and panels. |
|
| 1. |
Remove the front door scuff trim
and rear door scuff trim. |
| 2. |
To remove the seat belt anchor
pretensioner (C), keep on pushing the lock pins (A) as arrow direction.
And then remove the seat belt after pushing the lock pin (B).
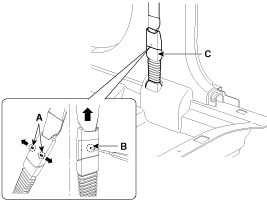
|
| 3. |
Remove the center pillar lower
trim (A).
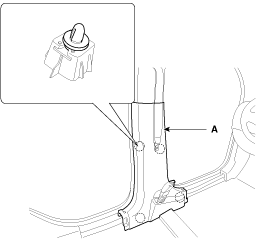
|
| 4. |
After loosening the mounting
screws, then remove the center pillar upper trim (A).
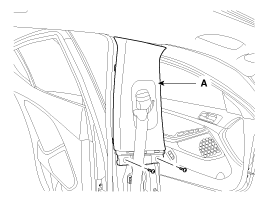
|
| 5. |
Installation is the reverse of
removal.
| ŌĆó
|
Replace any damaged
clips. |
|
|
Rear Pillar Trim Replacement
| ŌĆó |
Put on gloves to protect
your hands. |
| ŌĆó |
Use a plastic panel removal
tool to remove interior trim pieces to protect from marring the
surface. |
| ŌĆó |
Take care not to bend
or scratch the trim and panels. |
|
| 1. |
Using a screwdriver or remover,
remove the rear pillar trim (A).
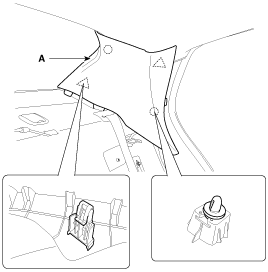
|
| 2. |
Installation is the reverse of
removal.
| ŌĆó
|
Replace any damaged
clips. |
|
|
Package Tray Trim Replacement
| ŌĆó |
Put on gloves to protect
your hands. |
| ŌĆó |
Use a plastic panel removal
tool to remove interior trim pieces to protect from marring the
surface. |
| ŌĆó |
Take care not to bend
or scratch the trim and panels. |
|
| 1. |
Remove the rear seat assembly.
(Refer to the BD group - "Rear Seat")
|
| 2. |
After loosening the mounting
bolt, then remove the rear seat belt lower anchor (A).
Tightening torque:39.2
~ 53.9 N.m (4.0 ~ 5.5 kgf.m, 28.8 ~ 39.8 lb-ft)
|
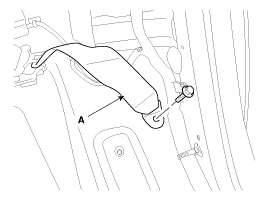
|
| 3. |
Using a screwdriver or remover,
remove the rear pillar trim (A).

|
| 4. |
Disconnect the connector (A).
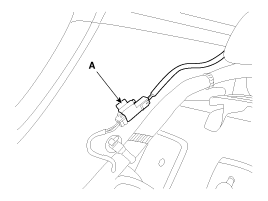
|
| 5. |
Using a screwdriver or remover,
remove the rear seat belt cover (B). |
| 6. |
After loosening the mounting
screws, then remove the package tray trim (A).
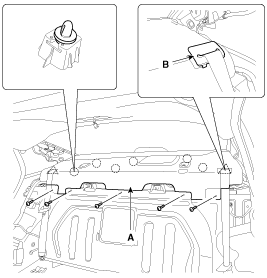
|
| 7. |
Installation is the reverse of
removal.
| ŌĆó
|
Replace any damaged
clips. |
| ŌĆó
|
Make sure the
connector is connected properly. |
|
|
Components
1. Front pillar trim
2. Center pillar upper trim
3. Center pillar lower trim
4. Rear pillar trim
5. Cowl side trim
6. Front door scuff trim
7. Rea ...
Replacement
[General]
ŌĆó
Put on gloves to protect
your hands.
ŌĆó
Use ...
See also:
Inspection
1.
Check the rubber parts for wear
and deterioration.
2.
Compress and extend the piston
rod (A) and check that there is no abnormal resistance or unusual sound
du ...
Replacement
1.
Disconnect the negative (-) battery
terminal.
2.
With the (-) driver, remove the
photo sensor (A) from the center of defrost nozzle.
3.
Ins ...
Valve Body. Description and Operation
Description
The valve body is essential to automatic transaxle control and consists of various
valves used to control the oil feed from the oil pump. Specifically, these valves
consist of pressur ...
 Kia Optima: Interior Trim. Repair procedures
 Interior Trim. Components and Components Location
 Trunk Trim. Repair procedures


