 Kia Optima: Installation
| 1. |
Remove the ignition key from
the vehicle. |
| 2. |
Disconnect the battery negative
cable and wait for at least three minutes. |
| 3. |
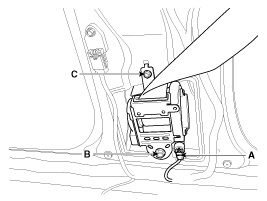
Install the seat belt pretensioner
with bolts (B, C).
Tightening torque:Bolt
B: 39.2 ~ 53.9 N.m (4.0 ~ 5.5 kgf.m, 28.9 ~ 39.8 lb-ft)
|
|
| 4. |
Connect the seat belt pretensioner
connector (A). |
| 5. |
Install the upper anchor bolt.
Tightening torque:39.2
~ 53.9 N.m (4.0 ~ 5.5 kgf.m, 28.9 ~ 39.8 lb-ft)
|
|
| 6. |
Install the center pillar trim.
(Refer to the Body group- Interior trim) |
| 7. |
Install the door scuff trim.
(Refer to the Body group- Interior trim) |
| 8. |
Insert the seat belt to the anchor
pretensioner.
|
Make sure the lock pin is connected in properly. |
|
| 9. |
Reconnect the battery negative
cable. |
| 10. |
After installing the seat belt
pretensioner, confirm proper system operation:
| A. |
Turn the ignition switch
ON; the SRS indicator light should be turned on for about six seconds
and then go off. |
|
1.
Disconnect the battery negative
cable, and wait for at least three minutes before beginning work.
2.
To remove the seat belt anchor
pretensioner (C), keep on push ...
Description
Front seat belt anchor pretensioner operates as well as belt pretensioner at the
same time If it gets into its deploy condition after a collision. It is located
at near anchor on fron ...
See also:
Specifications
The specifications given here are for general information only. Please check
with an authorized Kia dealer for more precise and more up-to-date information.
DIMENSIONS Unit: in (mm)
WEIGHTS
Ref ...
Knock Sensor (KS). Description and Operation
Description
Knocking is a phenomenon characterized by undesirable vibration
and noise and can cause engine damage. Knock Sensor (KS) is installed on the
cylinder block and senses engine knockin ...
EPB Switch. Repair procedures
Remove
1.
Turn ignition OFF and disconnect
the negative (-) battery cable.
2.
Remove the floor console upper
cover.(Refer to Body group - "Console")
...
 Removal
 Anchor Pretensioner (APT). Description and Operation