 Kia Optima: Inspection
Rear Brake Disc Thickness Check
| 1. |
Check the brake pads for wear
and fade. |
| 2. |
Check the brake disc for damage
and cracks. |
| 3. |
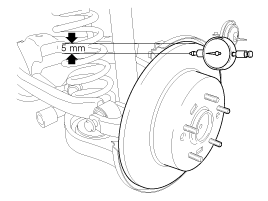
Remove all rust and contamination
from the surface, and measure the disc thickness at 8 points, at least,
of same distance (5mm) from the brake disc outer circle.
Brake disc thicknessStandard:
10 mm (0.39 in)
Service limit: 8.4 mm (0.33 in)Deviation: less than 0.01 mm (0.0004
in)
|
|
| 4. |
If wear exceeds the limit, replace
the discs and pad assembly left and right of the vehicle. |
Rear Brake Pad Check
| 1. |
Check the pad wear. Measure the
pad thickness and replace it, if it is less than the specified value.
Pad thicknessStandard value:
10 mm (0.393 in)
Service limit: 2.0 mm (0.0787 in)
|
|
| 2. |
Check that grease is applied,
to sliding contact points. Check for metal damage to the pad and backing.
|
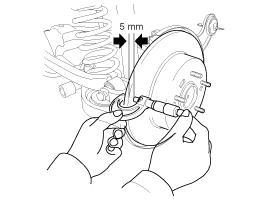
Rear Brake Disc Runout Check
| 1. |
Place a dial gauge about 5mm
(0.2 in.) from the outer circumference of the brake disc, and measure the
runout of the disc.
Brake disc runoutLimit:
0.05 mm (0.002 in.) or less (new one)
|
|
| 2. |
If the runout of the brake disc
exceeds the limit specification, replace the disc, and then measure the
runout again. |
| 3. |
If the runout exceeds the limit
specification, install the brake disc after turning it 180┬░ and then check
the runout of the brake disc again. |
| 4. |
If the runout cannot be corrected
by changing the position of the brake disc, replace the brake disc. |
Rear brake pads
1.
Remove the rear wheel & tire.
2.
Connect the GDS to the data link
connector located underneath the dash panel.
3.
Ignition "ON& ...
1.
Installation is the reverse of
removal.
2.
Use a SST (09581-11000) when
installing the brake caliper assembly.
3.
After installation, bleed ...
See also:
Components and Components Location
Component Location
1. Windshield wiper arm & blade
2. Wiper & washer switch
3. Windshield washer hose
4. Windshield wiper motor & linkage
5. Washer mo ...
Removal
1.
Remove the front wheel and tire.
Tightening torque:88.3
~ 107.9 N.m (9.0 ~ 11.0 kgf.m, 65.1 ~ 79.6 lb-ft)
2.
Remove the front wheel spee ...
Key Reminder Warning Chime
If the driverŌĆÖs door is opened and the ignition key is left in the ignition switch,
the key reminder warning chime will sound. This is to remind you to remove your
keys from the ignition before ...
 Replacement (With EPB)
 Installation