 Kia Optima: Disassembly
| 1. |
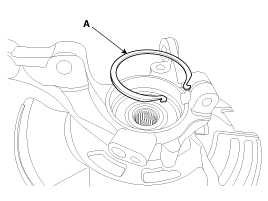
Remove the snap ring (A).

|
| 2. |
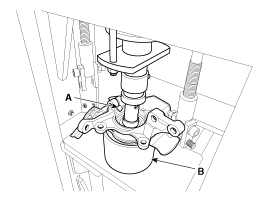
Remove the hub assembly from
the knuckle assembly.
| (1) |
Install the front knuckle
assembly (A) on press. |
| (2) |
Lay a suitable adapter
(B) upon the hub assembly shaft. |

|
| 3. |
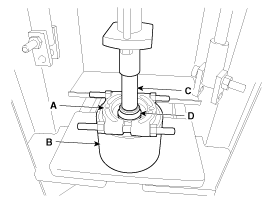
Remove the hub bearing inner
race from the hub assembly.
| (1) |
Install a suitable tool
(A) for removing the hub bearing inner race on the hub assembly. |
| (2) |
Lay the hub assembly
and tool (A) upon a suitable adapter (B). |
| (3) |
Lay a suitable adapter
(C) upon the hub assembly shaft. |
| (4) |
Remove the hub bearing
inner race (D) from the hub assembly by using press. |

|
| 4. |
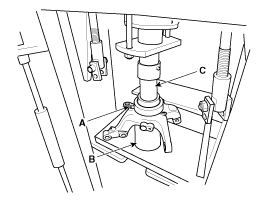
Remove the hub bearing outer
race from the knuckle assembly.
| (1) |
Lay the hub assembly
(A) upon a suitable adapter (B). |
| (2) |
Lay a suitable adapter
(C) upon the hub bearing outer race. |
| (3) |
Remove the hub bearing
outer race from the knuckle assembly by using press. |

|
| 5. |
Replace hub bearing with a new
one. |
1.
Check the hub for cracks and
the splines for wear.
2.
Check the brake disc for scoring
and damage.
3.
Check the knuckle for cracks
4. ...
1.
Install the hub bearing to the
knuckle assembly.
(1)
Lay the knuckle assembly
(A) on press.
(2)
Lay a new hub bearing
upon the k ...
See also:
Seat belt warning (for driverŌĆÖs seat)
The driver's seat belt warning light and chime will activate to the following
table when the ignition switch is in "ON" position.
*1 Warning pattern repeats 11 times with an inter ...
Seat Heater (Non-Air Ventilation). Repair procedures
Inspection
First Seat Heater
1.
Check for continuity and measure
the resistance between No.4 and No.6 terminals.[Cushion]
No.
Description ...
Gasoline containing alcohol and methanol
Gasohol, a mixture of gasoline and ethanol (also known as grain alcohol), and
gasoline or gasohol containing methanol (also known as wood alcohol) are being marketed
along with or instead of leade ...
 Kia Optima: Disassembly
 Inspection
 Reassembly


