 Kia Optima: Removal and Installation
| 1. |
Disconnect the battery terminals.
(Refer to Engine and transaxle assembly in this group) |
| 2. |
Remove the air cleaner assembly
and the intercooler inlet/outlet hoses. (Refer to Engine and transaxle assembly
in this group) |
| 3. |
Remove the battery and battery
tray. (Refer to Engine and transaxle assembly in this group) |
| 4. |
Remove the under covers. (Refer
to Engine and transaxle assembly in this group) |
| 5. |
Loosen the drain plug, and drain
the engine coolant. Remove the radiator cap to drain with speed. |
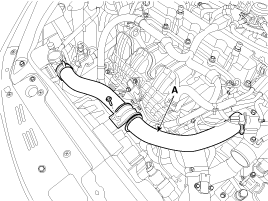
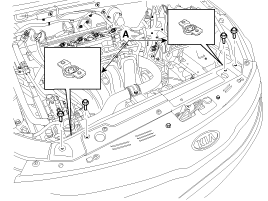
| 6. |
Disconnect the radiator upper
hose (A).
|
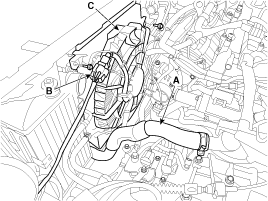
| 7. |
Disconnect the lower hose (A),
the fan motor connector (B) and then remove the cooling fan assembly (C).
Tightening torque :4.9
~ 7.8 N.m (0.5 ~ 0.8 kgf.m, 3.6 ~ 5.8 lb-ft)
|
|
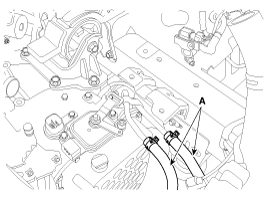
| 8. |
Disconnect the ATF cooler hoses
(A/T only). (Refer to AT group)
|
| 9. |
Disconnect the over flow hose
(A) from the radiator.
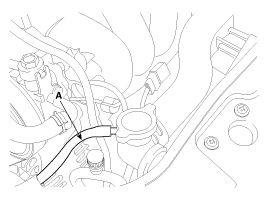
|
| 10. |
Remove the radiator mounting
brackets (A).
Tightening torque:3.9 ~
5.9 N.m (0.4 ~ 0.6 kgf.m, 2.9 ~ 4.3 lb-ft)
|
|
| 11. |
Separate the condenser from the
radiator and then remove the radiator assembly (A).
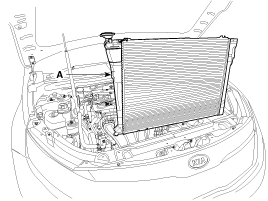
|
| 12. |
Installation is the reverse order
of removal. |
| 13. |
Fill the radiator with coolant
and check for leaks.
| ŌĆó
|
Bleed air from
the cooling system. |
| -
|
Start engine
and let it run until it warms up. (Until the radiator fan
operates 3 or 4 times.) |
| -
|
Turn off engine.
Check the coolant level and add coolant if needed. This
will allow trapped air to be removed from the cooling system.
|
| -
|
Put the radiator
cap on tightly, then run engine again and check for leaks. |
|
|
Radiator Cap Testing
1.
Remove the radiator cap, wet
its seal with engine coolant, and then install it on a pressure tester.
2.
Apply a pressure of 93.16 ~ 122.58k ...
See also:
Pregnant women
The use of a seat belt is recommended for pregnant women to lessen the chance
of injury in an accident. When a seat belt is used, the lap belt portion should
be placed as low and snugly as possibl ...
Remote keyless entry system operations
Type A
Type B
Lock (1)
All doors are locked if the lock button is pressed. If all doors (and trunk)
are closed, the hazard warning lights will blink once to indicate that all doors
(and tru ...
Front Body C
Engine mounting bracket hole (Ø11)
Transaxle mounting hole (Ø13)
Engine mounting bracke ...

 Inspection