 Kia Optima: Removal
| 1. |
Turn the ignition switch OFF. |
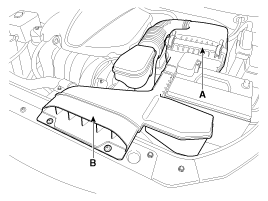
| 2. |
Remove the air duct (B) and air
cleaner assembly (A).
|
| 3. |
Remove the ECM connector (B)
and the arrange the wiring harness (A).
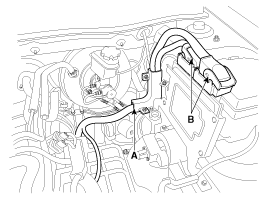
|
| 4. |
Pull up the lock of the HECU
connector (A) , then disconnect the connector.
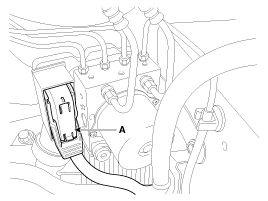
|
| 5. |
Remove the brake fluid from the
master cylinder reservoir with a syringe.
| ŌĆó
|
Be sure to completely
remove foreign substances from around brake fluid reservoir
and cap before opening the reservoir cap. If not, it may
cause contamination of brake fluid and deterioration in
braking performance. |
| ŌĆó
|
Do not spill
brake fluid on the vehicle, it may damage the paint; if
brake fluid does contact the paint, wash it off immediately
with water. |
|
|
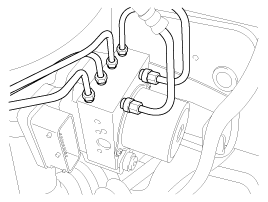
| 6. |
Disconnect the brake tubes from
the HECU by unlocking the nuts counterclockwise with a spanner.
Tightening torque:M10:
11.7 ~ 15.7 N.m (1.2 ~ 1.6 kgf.m, 8.7 ~ 11.6 lb-ft)
M12: 18.6 ~ 22.6 N.m (1.9 ~ 2.3 kgf.m, 13.7 ~ 16.6 lb-ft)
|
|
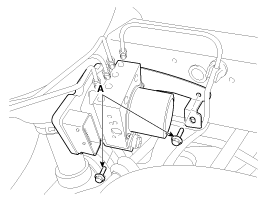
| 7. |
Loosen the HECU bracket bolts
(A), then remove HECU and bracket.
Tightening torque :19.6
~ 29.4 N.m(2.0 ~ 3.0 kgf.m, 14.5 ~ 21.7 lb-ft)
|
| 1. |
Never attempt
to disassemble the HECU. |
|
|
| 8. |
Remove the 2 nuts (B), then remove
the bracket from HECU.
Tightening torque :10.8
~ 13.7 N.m (1.1 ~ 1.4 kgf.m, 8.0 ~ 10.1 lb-ft)
|
|
1.
Installation is the reverse of
removal.
2.
Tighten the HECU mounting bolts
and nuts to the specified torque.
3.
After installation, bleed the
b ...
See also:
Manual operation
If the sunroof does not operate electrically
1. Remove the rectangular plastic lens in the front of the roof panel.
2. Turn the cross bolt with a Phillips screw driver counterclockwise to remove t ...
Installation
Parking Brake Shoe
1.
Install the shoe hold down pin
(A) and spring (B) by pressing and rotating the spring.
2.
Install the operating lever assembly
(D) and th ...
Rear safety belts
Two kinds of belts are provided:
Lap/shoulder belts for people who sit on the outboard sides of the rear
seat.
A lap belt for people who sit in the center of the rear seat.
Rear Lap/Should ...

 Installation