 Kia Optima: Removal
| 1. |
Remove the rear wheel & tire.
Tightening torque:88.3
~107.9 N.m(9.0 ~11.0 kgf.m, 65.1 ~79.6 lb-ft)
|
|
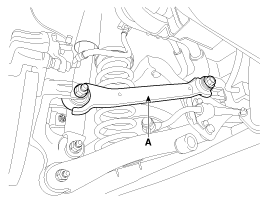
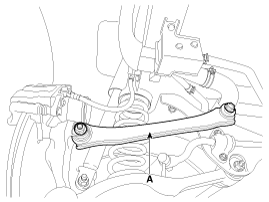
| 2. |
Remove the rear upper arm (A).
|
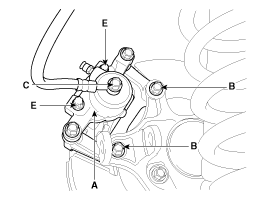
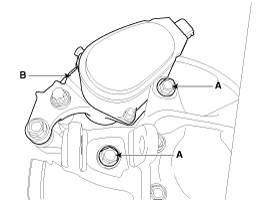
| 3. |
Loosen the hose eyebolt (C) and
caliper mounting bolts (B), then remove the rear caliper assembly (A).
Tightening torque:Brake
hose to caliper (C):
24.5 ~ 29.4 N.m (2.5 ~ 3.0 kgf.m, 18.1 ~ 21.7 lb-ft)Caliper assembly
to carrier (B):
63.7 ~ 73.5 N.m (6.5 ~ 7.5 kgf.m, 47.0 ~ 54.2 lb-ft)
|
|
Do not loosen the bolts (E) instead of guide rod bolt. |
|
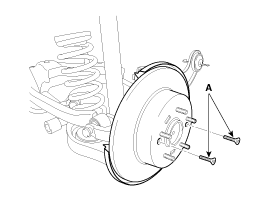
| 4. |
Remove the rear brake disc by
loosening the screws (A).
|
[With EPB]
| 1. |
Remove the rear wheel & tire.
Tightening torque:88.3
~ 107.9 N.m (9.0 ~ 11.0 kgf.m, 65.1 ~ 79.6 lb-ft)
|
|
| 2. |
Release the parking brake. |
| 3. |
Disconnect the EPB actuator connector
(A).
|
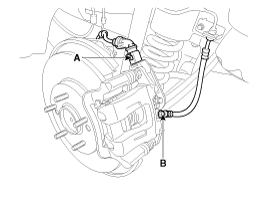
| 4. |
Disconnect the brake hose from
the brake caliper by loosening the bolt (B). |
| 5. |
Remove the rear upper arm (A).
|
| 6. |
Loosen the caliper mounting bolts
(A) and then remove the rear caliper assembly (B).
Tightening torque:49.0
~ 58.8 N.m (5.0 ~ 6.0 kgf.m, 36.2 ~ 43.4 lb-ft)
|
|
| 7. |
Remove the rear brake disc by
loosening the screws (A).

|
Rear brake pads
1.
Loosen the guide rod bolt (B)
and pivot the caliper (A) up out of the way.
Tightening torque:21.6
~ 31.4 N.m (2.2 ~ 3.2 kgf.m, 15.9 ~ 23.1 lb-ft)
...

 Replacement (Without EPB)