 Kia Optima: Removal
| Shift Lever Assembly Replacement |
| 1. |
Remove the center console assembly.
(Refer to "Interior(console)" in BD group.) |
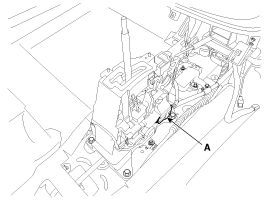
| 2. |
Disconnect sports mode connector
(A).
|
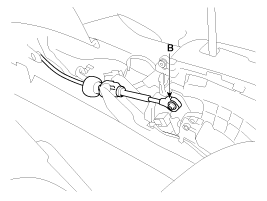
| 3. |
Remove the shift cable (B).
|
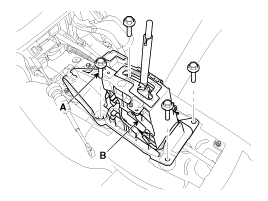
| 4. |
Remove the shift lever assembly
(B) by removing the bolts (A-4ea).
Tightening torque:9.8 ~
14.7 N.m (1.0 ~ 1.5 kgf.m, 7.2 ~ 10.9 lb-ft)
|
|
| 5. |
Installation is the reverse of
removal.
|
Make sure vehicle does not roll before setting room side shift lever
and T/M side manual control lever to "N" position. |
|
Control Cable Replacement
| 1. |
Remove the center console assembly.
(Refer to "Interior(console)" in BD group.) |
| 2. |
Remove the control cable (B).
|
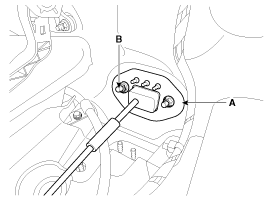
| 3. |
Remove the control cable assembly
in the vehicle after removing the nuts (B) and the retainer (A).
Tightening torque:9.8 ~
14.7 N.m (1.0 ~ 1.5 kgf.m, 7.2 ~ 10.9 lb-ft)
|
|
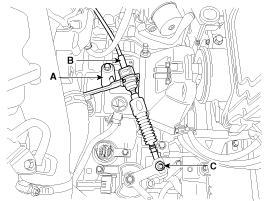
| 5. |
Remove the cable (B) from the
bracket (A) at transaxle assembly side (Refer to "Automatic Transaxle" in
this group).
|
| 6. |
Remove the control cable inside
of cab. |
1.
Installation is the reverse of
removal.
Make sure vehicle does not roll before setting room sid ...
See also:
Air intake control
The air intake control is used to select outside (fresh) air position or recirculated
air position.
To change the air intake control position, push the control button.
Recirculated air position
...
Trouble Diagnostics When Using GDS
1.
The body control module can diagnose
by using the GDS more quickly.The BCM communicates with the GDS and then
reads the input/output value and drives the actuator.
...
Charging System Warning
This warning light indicates
a malfunction of either the generator or electrical charging system. If the warning
light illuminates while driving:
1. Drive to the nearest safe location and careful ...



 Installation