 Kia Optima: Removal
| 1. |
Turn ignition switch OFF and
disconnect the negative (-) battery cable. |
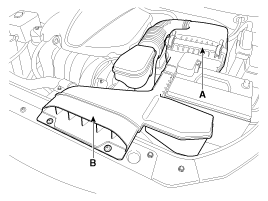
| 2. |
Remove the air duct (B) and air
cleaner assembly (A).
|
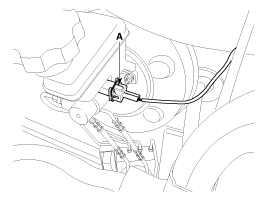
| 3. |
Disconnect the brake fluid level
switch connector (A), and remove the reservoir cap.
|
| 4. |
Remove the brake fluid from the
master cylinder reservoir with a syringe.
| ŌĆó
|
Be sure to completely
remove foreign substances from around brake fluid reservoir
and cap before opening the reservoir cap. If not, it may
cause contamination of brake fluid and deterioration in
braking performance. |
| ŌĆó
|
Do not spill
brake fluid on the vehicle, it may damage the paint; if
brake fluid does contact the paint, wash it off immediately
with water. |
|
|
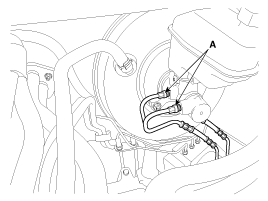
| 5. |
Disconnect the brake tube (A)
from the master cylinder by loosening the tube flare nut.
Tightening torque:18.6
~ 22.6 N.m (1.9 ~ 2.3 kgf.m, 13.7 ~ 16.6 lb-ft)
|
|
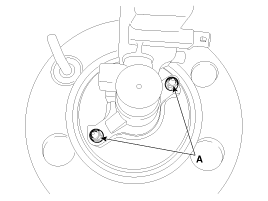
| 6. |
Remove the master cylinder from
the brake booster after loosening the mounting nuts (A).
Tightening torque:12.7
~ 16.7 N.m (1.3 ~ 1.7 kgf.m, 9.4 ~ 12.3 lb-ft)
|
|
1.
Installation is the reverse of
removal.
2.
After installation, bleed the
brake system. (Refer to Brake system bleeding)
...
See also:
Reset items
Items should be reset after the battery
has been discharged or the battery has
been disconnected.
Auto down window (See section 4)
Sunroof (See section 4)
Trip computer (See section 4)
C ...
Description
Automatic transaxle system relies on various measurement data to determine the current
control status and extrapolate the necessary compensation values. These values are
used to control the actuat ...
Fuel Tank Pressure Sensor (FTPS). Description and Operation
Description
Fuel Tank Pressure Sensor (FTPS) is a component of the evaporative
emission control system. It is installed on the fuel tank near the fuel pump
assembly. It checks the evaporative s ...

 Installation