 Kia Optima: Removal
| 1. |
Remove the battery and the battery
tray. (Refer to "Charging system" in EE group.) |
| 2. |
Remove the under cover (A).
Tightening torque:7.8 ~
11.8 N.m (0.8 ~ 1.2 kgf.m, 5.8 ~ 8.7 lb-ft)
|
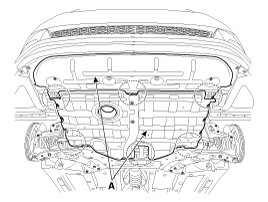
|
| 3. |
Replace new gasket and the plug
after draining the automatic transaxle fluid by removing the drain plug.
(Refer to "Hydraulic system (Fluid)" in this group) |
| 4. |
Remove the valve body cover (B)
and eyebolt (A).
Tightening torque:(A) 34.3
~ 44.1 N.m (3.5 ~ 4.5 kgf.m, 25.3 ~ 32.6 lb-ft)
(B) 13.8 ~ 14.7 N.m (1.3 ~ 1.5 kgf.m, 9.4 ~ 10.8 lb-ft)
|
|
Always replace the gasket of the eyebolt use new one whenever loosening
eyebolt. |
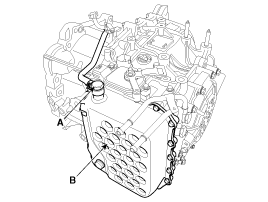
|
| 5. |
Remove the plate and the detent
spring (A) after removing the bolt.
Tightening torque:24.5
~ 35.3 N.m (2.5 ~ 3.6 kgf.m, 18.1 ~ 26.0 lb-ft)
|
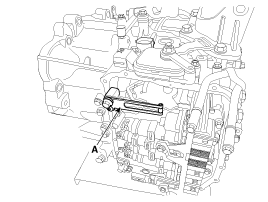
|
| 6. |
Remove the bolt (3ea) after disconnecting
the solenoid valve (A) connector and the oil temperature sensor connector
(B).
Tightening torque:9.8 ~
11.8 N.m (1.0 ~ 1.2 kgf.m, 7.2 ~ 8.7 lb-ft)
|
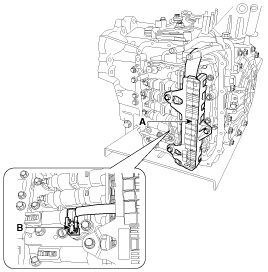
|
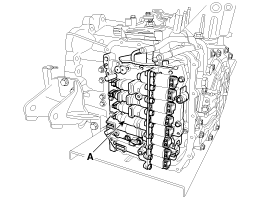
| 7. |
Remove the valve body assembly
(A).
Tightening torque:9.8 ~
11.8 N.m (1.0 ~ 1.2 kgf.m, 7.2 ~ 8.7 lb-ft)
|
|
1.
Installation is the reverse of
removal.
After replacement or reinstallation procedure of the valve body assembly, ...
See also:
Front Body A
Hood hinge mounting hole (Ø10)
Fender apron upper inner panel tooling hole (Ø6.6)
Front sus ...
Installation
1.
Installation is the reverse of
removal.
After replacement or reinstallation procedure of the valve body assembly, ...
Repair procedures
If the there is lack of power, excessive oil consumption or poor fuel economy,
measure the compression pressure.
1.
W ...

 Installation