 Kia Optima: Removal
|
In case of removing the high pressure fuel pump,
high pressure fuel pipe, delivery pipe, and injector, there may be injury
caused by leakage of the high pressure fuel. So donŌĆÖt do any repair
work right after engine stops.
|
| 1. |
Turn the ignition switch OFF and disconnect the battery
negative (-) cable. |
| 2. |
Release the residual pressure in fuel line (Refer
to ŌĆ£Release Residual Pressure in Fuel LineŌĆØ in this group).
|
When removing the fuel pump relay, a Diagnostic
Trouble Code (DTC) may occur.
Delete the code with the GDS after completion
of ŌĆ£Release Residual Pressure in Fuel LineŌĆØ work. |
|
| 3. |
Remove the air cleaner and the air intake hose (Refer
to ŌĆ£Intake And Exhaust SystemŌĆØ in EM group). |
| 4. |
Disconnect the fuel pressure regulator valve connector
(A). |
| 5. |
Remove the ignition coil (B). 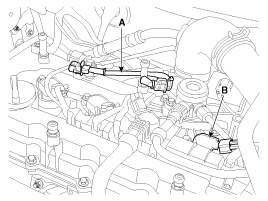
|
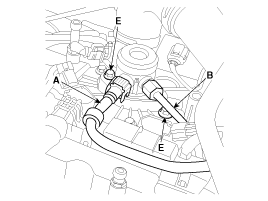
| 6. |
Disconnect the fuel feed tube quick-connector (A). |
| 7. |
Remove the high pressure fuel pipe.
| (1) |
Remove the installation nut (B) from the
high pressure fuel pump with the special service tool [SST No.:
09314-3Q100] 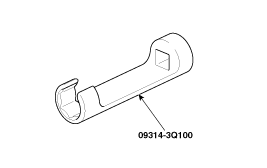
|
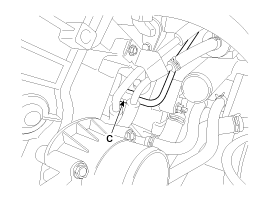
| (2) |
Remove the installation nut (C) from the
delivery pipe with the special service tool [SST No.: 09314-3Q100] |
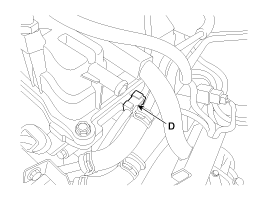
| (3) |
Remove the purge control solenoid valve (Refer
to ŌĆ£Purge Control Solenoid ValveŌĆØ in this group). |
| (4) |
Remove the function block (D), and then remove
the high pressure fuel pipe. |
|
| 8. |
Remove the installation bolts (E), and then remove
the high pressure fuel pump from the cylinder head assembly.
|
Unscrew in turn the two bolts in small step
(0.5 turns). In case of fully unscrewing one of the two bolts
with the other bolt installed, the housing surface of the cylinder
head may be broken because of tension of the pump spring.
|
|
ŌĆó
Be sure to check the low pressure fuel hose
quick-connector (A) is completely connected to the high pressure ...
See also:
Installation
1.
Install the seat heater switch.
2.
Install the power window switch.
3.
Install the rear door trim.
...
Components and Components Location
Components
1. HECU module
2. Front wheel speed sensor
3. Rear wheel speed sensor
4. Yaw rate & Lateral G sensor
5. Steering angle sensor
6. ABS Warning lamp
...
Replacement
Hood Assembly Replacement
ŌĆó
When removing and installing
the hood, an assistant is necessary.
...

 Installation