 Kia Optima: Reassembly
| 1. |
Wrap tape around the driveshaft
spline(TJ) to prevent damage to the boots. |
| 2. |
Apply grease to the joint boot
on the side of the wheel and install the boot.
Lubricants Quantity:GRB006
(UREA) 105g (3.7 OZ.)
|
|
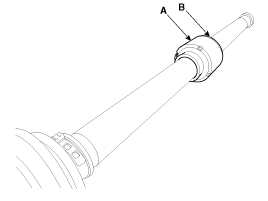
| 3. |
Using the SST (09495-3K000),
secure the boot band.
Clearance (A): 2.0 mm (0.079
in) or less
|

|
| 4. |
To install the dynamic damper
(A), keep the shaft in a straight line and assemble the dynamic damper with
the bands(B).
|
| 5. |
Assemble the transaxle side joint
boot and bands. |
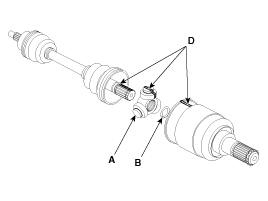
| 6. |
Using the alignment marks (D)
made during disassembly as a guide, install the spider assembly (A) and
snap ring (B) on the driveshaft splines (C).
Lubricants Quantity:SH06-VX21
(UREA) 145g (5.1 OZ.)
|

|
| 7. |
Add specified grease to the joint
boot as much as it was wiped away at inspection. |
| 8. |
Install the both boot band. |
ŌĆó
Do not disassemble the
BJ assembly.
ŌĆó
Special grease must be
applied to t ...
See also:
Operating HomeLink
Simply press the appropriate HomeLink button to activate the trained product
(garage door, security system, entry door lock, estate gate, lighting, etc.). The
original handheld transmitters may al ...
Map Light (Sun Glasses Holder)
The lights are switched ON or OFF by pressing the corresponding switches. ...
Function
Wiper Control
Washer Control Coupled With Wiper
1.
Under IGN2 = ON, wiper LOW relay
is turned ON after T2 from Washer switch ON if washer switch is ON for T1
and wipe ...
 Disassembly
