 Kia Optima: Rear wheel alignment
|
When using a commercially available computerized wheel alignment equipment
to inspect the rear wheel alignment, always position the vehicle on a level
surface. Prior to inspection, make sure that the rear suspension system
is in normal operating condition and that the tires are inflated to the
specified pressure.
|
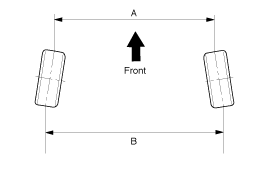
Toe

B - A. 0: Toe in (+)B - A < 0:
Toe out (-)
|
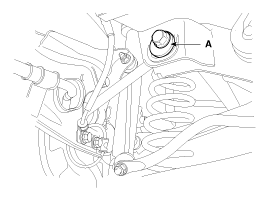
Toe adjustment
| 1. |
Loosen the nut holding the assist
arm cam bolt (A). |
| 2. |
Adjust rear toe by turning the
rear assist arm cam bolt (A) clockwise or counter clockwise. Toe adjustment
should be made by turning the right and left cam bolt by the same amount.
Toe-inTotal : 0.17┬░┬▒0.2┬░
Individual : 0.085┬░┬▒0.1┬░
|

|
| 3. |
When completing the toe adjustment,
tighten the nut to specified torque.
Tightening torque:107.9
~ 117.7 N.m (11.0 ~ 12.0 kgf.m, 79.6 ~ 86.8 lb-ft)
|
|
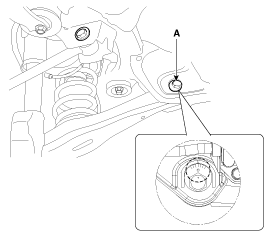
Camber Adjustment
| 1. |
Adjust rear camber by turning
the rear lower arm cam bolt (A)clockwise or counter clockwise.
| ŌĆó
|
Only a gradation
fixes 0.4┬░ as adjusting bolt. |
| ŌĆó
|
LH : Clockwise
camber (+) |
| ŌĆó
|
RH : Clockwise
camber (-) |
|

| ŌĆó
|
Camber must be
adjusted within ┬▒90┬░ from shown position. |
| ŌĆó
|
Marking position
must be set as shown. |
|
|
| 2. |
When completing the rear camber
adjustment, tighten the nut to specified torque.
Tightening torque :117.7
~ 137.3N.m (12.0 ~ 14.0kgf.m, 86.8 ~ 101.3lb-ft)
|
|
When using a commercially available computerized wheel alignment equipment
to inspect the front wheel alignment, always position the ...
See also:
Removal
1.
Remove the steering column upper
and lower shrouds after removing 3 screws.
2.
Remove the wiper switch (A) by
releasing the part.
3.
If nec ...
Installation
1.
Install the multimedia jack.
2.
Connect the multimedia jack connector.
3.
Install the console upper cover.
4.
Install the shift lever knob. ...
Inspection
1.
With the washer motor connected
to the reservoir tank, fill the reservoir tank with water.
Befo ...
 Kia Optima: Rear wheel alignment
 Front wheel alignment


