 Kia Optima: Installation
| 1. |
The key of crankshaft should
be aligned with the mating face of main bearing cap. As a result of this,
the piston of No.1 cylinder is placed at the top dead center on compression
stroke. |
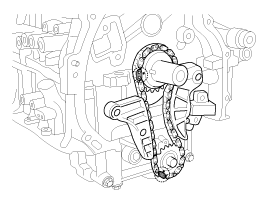
| 2. |
Confirm the balance shaft & oil
pump module timing mark. Timing marks to be visually aligned with centers
of adjacent cast timing notche.

|
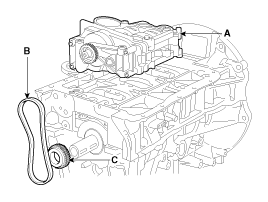
| 3. |
Install the balance shaft & oil
pump module (A) with the chain (B) and the sprocket (C).
|
The timing marks of balance shaft & oil pump module sprocket and
crankshaft sprocket should be matched with the timing marks (color
link) of balance shaft chain. |
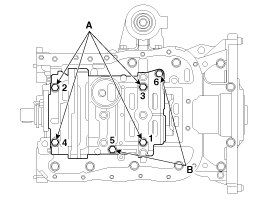
Tightening order
| (1) |
Tighten the bolts in
order number as shown with seating torque 26.4 N.m (3.0kgf.m, 21.7
lb-ft) and then loosen the bolts as reverse tightening order. (6-5-4-3-2-1). |
| (2) |
Using the SST (09221-4A000),
tighten the bolts as specified tightening order in same increments
as follows.
Tightening torque
:Bolts (A) (M9x181.5) : 22.6~26.5N.m (2.3~2.7kgf.m, 16.6~19.5lb-ft)
+ 88~92┬░
Bolts (B) (M9x95) : 22.6~26.5N.m (2.3~2.7kgf.m, 16.6~19.5lb-ft)
+ 43~47┬░
|
|
|
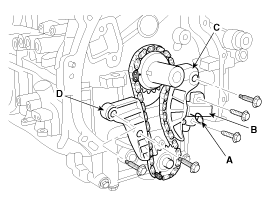
| 4. |
Install the balance shaft chain
guide (D).
Tightening torque :9.8
~ 11.8N.m (1.0 ~ 1.2kgf.m, 7.2 ~ 8.7lb-ft)
|
|
| 5. |
Install the balance shaft chain
tensioner arm (C).
Tightening torque :9.8
~ 11.8N.m (1.0 ~ 1.2kgf.m, 7.2 ~ 8.7lb-ft)
|
|
| 6. |
Install the balance shaft chain
hydraulic tensioner (B) then remove the stopper pin (A).
Tightening torque :9.8
~ 11.8N.m (1.0 ~ 1.2kgf.m, 7.2 ~ 8.7lb-ft)
|
|
| 7. |
Confirm the timing marks. |
| 8. |
Remove the stopper pin (A) of
balance shaft module.
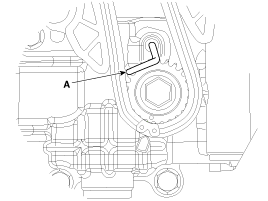
|
| 9. |
Install the timing chain. (Refer
to Timing system in this group) |
1.
Remove the timing chain. (Refer
to Timing system in this group)
2.
Install a stopper pin (A) after
compressing the balance shaft chain tensioner.
3.
...
See also:
Repair procedures
Inspection
[System Inspection]
1.
Disconnect the vapor hose from the throttle body
and connect a vacuum pump to the nipple on the throttle body.
2.
Chec ...
Inspection
1.
Check that the red light flickers
when the door lock or unlock button is pressed on the transmitter.
2.
Remove the battery (A) and check
voltage if the red light d ...
Replacement
1.
Disconnect the negative (-) battery
terminal.
2.
Loosen the mounting bolts and
then remove the under cover (A).
3.
Disconnect the connector ...
 Removal
