 Kia Optima: Installation
|
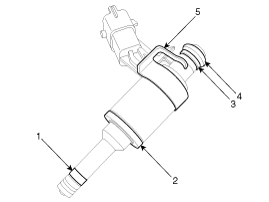
Do not reuse the injector retaining clip, O-ring,
backup ring, washer seal or combustion sealring. Once an injector is
removed, the five components must be replaced with new ones. |

| ŌĆó |
Item 1,3 and 4 are supplied in a single kit. |
|
| ŌĆó |
Install the component with the specified
torques. |
| ŌĆó |
Note that internal damage may occur when
the component is dropped. If the component has been dropped,
inspect before installing. |
|
| ŌĆó |
Apply engine oil to the injector O-ring. |
|
| ŌĆó |
Do not reuse the delivery pipe mounting bolts.
Once the delivery pipe is removed, the boltsmust be replaced
with new ones. |
|
| ŌĆó |
When inserting the injector, be careful not
to damage the injector tip. |
|
| ŌĆó |
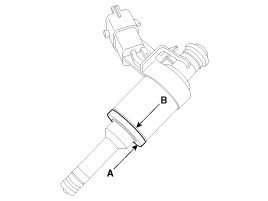
When replacing the washer seal, the steal
plate (A) part should be faced the cylinder installation part
and the rubber plate (B) part should be faced the injector body
part.
|
|

| ŌĆó |
Do not reuse the combustion seal. |
| ŌĆó |
Be careful not to apply engine oil on the
combustion seal ring. |
|
| ŌĆó |
Avoid dropping the fuel pipe (including injectors)
or bumping it into any hard objects sincedamage to the internal
components may occur. If necessary, visually inspect and confirmproper
operation with performance tests prior to reuse. |
| ŌĆó |
Before installing the injector into the cylinder
head, clean the injector hole and avoidcontaminants from entering
inside the injector hole. When installing the injector, avoid
bumpingthe injector tip into any of the surrounding components
since the tip may become damagedfrom the impact. |
| ŌĆó |
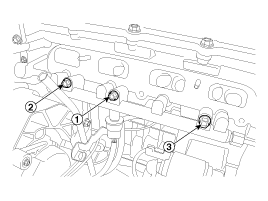
When fastening the three fuel delivery pipemounting
bolts, fully hand-tighten first, andthen tighten in the proper
sequence ( → →  →
→  ) in several cycles up tothe specified
torque. The delivery pipeshould move less than 1/8 inch (approx.3mm),
whenever each bolt is tightened. ) in several cycles up tothe specified
torque. The delivery pipeshould move less than 1/8 inch (approx.3mm),
whenever each bolt is tightened. |
|

| 1. |
Installation is reverse of removal.
|
In case of removing the high pressure fuel pump,
high pressure fuel pipe, delivery pipe, and injector, there may be injury
caused by ...
The injector combustion seal should be replaced new one to
prevent leakage after removing the injector.
1.
Remove the combustion seal (A) with a wire cutter.
...
See also:
Checking the Automatic Transaxle Fluid Level
The automatic transaxle fluid level should be checked regularly.
The volume of the transaxle fluid changes with temperature. Although it is best
to check the level after having driven the vehicle ...
Manual Climate Control System
...
Central door locks
The central door locking switch is located on the driverŌĆÖs arm rest. It is operated
by depressing the door lock switch. If any door is open when the switch is depressed,
the door will remain l ...
 Kia Optima: Installation


 Removal
 Replacement
 →
→  →
→  ) in several cycles up tothe specified
torque. The delivery pipeshould move less than 1/8 inch (approx.3mm),
whenever each bolt is tightened.