 Kia Optima: Disassembly
| 1. |
Disconnect the negative (-) battery
terminal. |
| 2. |
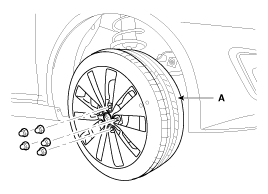
Remove the front tire (A) from
hub assembly.
Tightening torque :
10~15N.m (9~11kgf.m, 7.37~11lbf.ft)
|
|
| 3. |
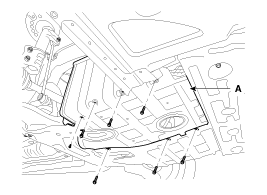
Loosen the mounting bolts and
then remove the under cover (A).
|
| 4. |
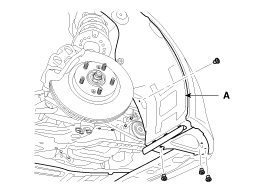
Loosen the mounting bolts and
clip then remove the wheel house (A).
|
| 5. |
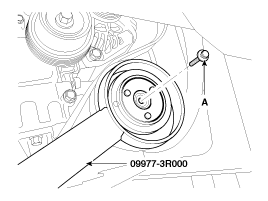
Remove the center bolt (A) while
holding the disc & hub assembly with SST( 09977-3R000).
Tightennig torque :10.7~14.9N.m
(1.1~1.52kgf.m, 7.9~10.9lbf.ft)
|
|
| 6. |
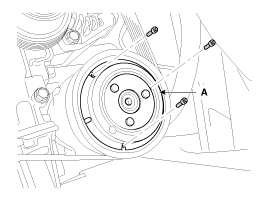
Loosen the mounting screws and
then remove the disc & hub assembly (A).
Tightening torque :
4.9~6.9 N.m(0.5~0.71Kgf.m, 3.6~5.1 Ib-ft)
|
|
| 7. |
Loosen the drive belt. (Refer
to EM group - "Drive Belt")
|
| 8. |
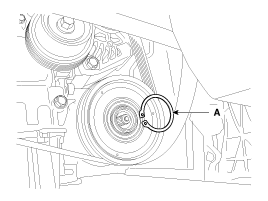
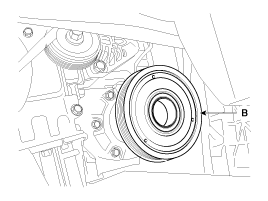
Disconnect the retainer ring
(A) and then remove the pulley(B).
| -
|
Be careful not
to damage the pulley (B) and compressor during removal/installation. |
| -
|
Once retainer
ring (A) is removed, replace it with a new one. |
|
|
| 9. |
Reassemble the compressor clutch
in the reverse order of disassembly, and note these items :
| A. |
Clean the pulley and
compressor sliding surfaces with non-petroleum solvent. |
| B. |
Install new retainer
rings, and make sure they are fully seated in the groove. |
| C. |
Make sure that the pulley
turns smoothly after its reassembled. |
|
1.
Check the plated parts of the
disc & hub assembly (A) for color changes, peeling or other damage. If there
is damage, replace the clutch set.
2.
Check the pull ...
See also:
Wheel alignment and tire balance
The wheels on your vehicle were
aligned and balanced carefully at the
factory to give you the longest tire life
and best overall performance.
In most cases, you will not need to
have your whe ...
Disassembly
1.
Remove the snap ring (A).
2.
Remove the hub assembly from
the knuckle assembly.
(1)
Install the front knuckle
assembly (A) on press.
...
Overdrive Clutch Control Solenoid Valve(OD/C_VFS). Description and Operation
Description
Overdrive clutch control solenoid valve(OD/C_VFS) is attached to the valve body.
This variable force solenoid valve directly controls the hydraulic pressure inside
the overdrive clutc ...
 Kia Optima: Disassembly
 Inspection
 Condenser. Components and Components Location


