 Kia Optima: Replacement
| 1. |
Recover the refrigerant with
a recovery/ recycling/ charging station. |
| 2. |
Disconnect the negative (-) battery
terminal. |
| 3. |
Remove the discharge line and
liquid line (A) from the condenser.
Tightening torque :
3.9~5.8 N.m(0.4~0.6Kgf.m, 2.9~4.3 Ib-ft)
|
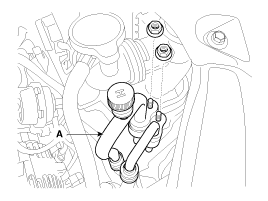
|
Plug or cap the lines immediately after disconnecting them to avoid
moisture and dust contamination. |
|
| 4. |
Disconnect the mounting clip,
and then remove the air duct hose assembly (A).
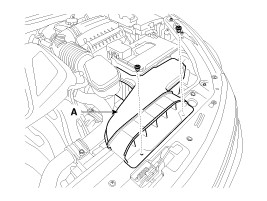
|
| 5. |
Loosen the radiator bracket mounting
bolts (A).
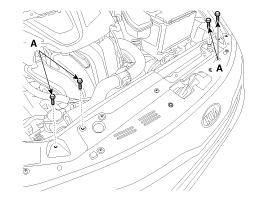
|
| 6. |
Remove the radiator fan. (Refer
to EM group - ŌĆ£RadiatorŌĆØ)
|
| 7. |
Disconnect the pin (A) and then
remove the condenser (C) from radiator (B).
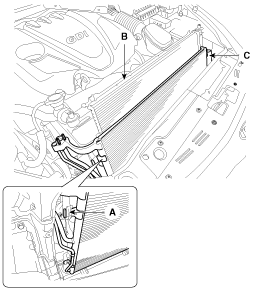
|
| 8. |
Install in the reverse order
of removal, and note these items :
| A. |
If you're installing
a new condenser, add refrigerant oil ND-OIL8. |
| B. |
Replace the O-rings with
new ones at each fitting, and apply a thin coat of refrigerant oil
before installing them. Be sure to use the right O-rings for R-134a
to avoid leakage. |
| C. |
Be careful not to damage
the radiator and condenser fins when installing the condenser. |
| D. |
Be sure to install the
lower mount cushions of condenser securely into the holes. |
| E. |
Charge the system, and
test its performance. |
|
1.
Check the condenser fins for
clogging and damage. If clogged, clean them with water, and blow them with
compressed air. If bent, gently bend them using a screwdriver or pliers.
...
Replacement
1.
Remove the condenser, and then
remove the bottom cap (B) with L wrench (A) from the condenser.
Tightening torque :20~25N.m
(2.0~2.5kgf.m, 14.5~18.2lb-ft) ...
See also:
Special
Service Tools
Special Service Tools
Tool (Number and name)
Illustration
Use
Alternator pulley remover wrench
(09373-27000)
Removal ...
Installation
ŌĆó
Install the component with the specified
torques.
ŌĆó
Note that internal d ...
SRS Control Module (SRSCM). Description and Operation
Description
The primary purpose of the SRSCM (Supplemental Restraints System Control Module)
is to discriminate between an event that warrants restraint system deployment and
an event that does n ...
 Inspection
 Receiver-Drier. Repair procedures