 Kia Optima: Receiver-Drier. Repair procedures
Replacement
| 1. | Remove the condenser, and then
remove the bottom cap (B) with L wrench (A) from the condenser.
|
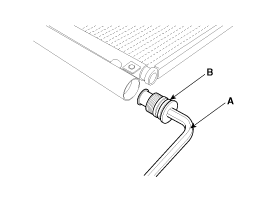
| 2. | Remove the desiccant (A) from
condenser using a long nose plier. Check for crumbled desiccant and clogged
bottom cap filter.
|
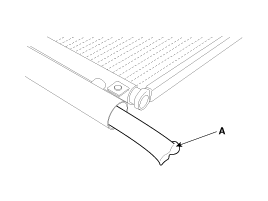
| 3. | Apply air conditioning compressor oil along the O-rings and threads of the new bottom cap. |
| 4. | Insert the new desiccant into the receiver drier tank. The desiccant must be sealed in vacuum before it is exposed to air for use. |
| 5. | Install the new bottom cap to
the condenser.
|
 Replacement
1.
Recover the refrigerant with
a recovery/ recycling/ charging station.
2.
Disconnect the negative (-) battery
terminal.
3.
Remove the discharge line ...
 A/C Pressure Transducer. Components and Components Location
Component Location
...
See also:
Inspection
1.
Measure the pressure of high
pressure line by measuring voltage output between NO.1 and NO.2 terminals.
2.
Inspect the voltage value whether
it is sufficie ...
Disassembly
-
Do not work in a dusty
or dirty place.
-
Do not touch the circuit
board with ...
If You Have a Flat Tire
The spare tire, tool bag, jack and jack handle are stored in the trunk compartment.
Move the carpeting out of the way to reach this equipment.
...
Categories
Kia Optima Manuals
- Kia Optima DL3 2019-2026 Owners Manual
- Kia Optima DL3 2019-2026 Service and Repair Manual
- Kia Optima TF 2011-{2019} Owners Manual
- Kia Optima TF 2011-2026 Service Manual
- Kia Optima MS/Magentis 2000-2005 Owners Manual

Copyright ® www.kiopman.com 2026