 Kia Optima: Removal and Installation
|
1. |
Remove the engine cover. |
|
2. |
Disconnect the battery negative terminal (A).
Tightening torque
:4.0 ~ 6.0N.m (0.4 ~ 0.6kgf.m, 3.0 ~ 4.4lb-ft)
|
|
|
3. |
Remove the air duct (B).

|
|
4. |
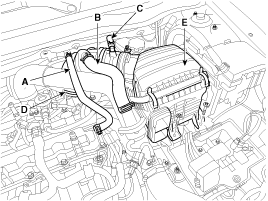
Remove the air cleaner assembly.
|
(1) |
Disconnect the breather hose (A), the recirculation
hose (B) and brake booster vacuum hose (C). |
|
(2) |
Disconnect the air intake hose (D) and then
remove the air cleaner assembly (E).
Tightening
torqueHose clamp bolt:
2.9 ~ 4.9N.m (0.3 ~ 0.5kgf.m, 2.2
~ 3.6lb-ft)
Air cleaner assembly bolts:
7.8 ~ 9.8N.m (0.8 ~ 1.0kgf.m, 5.8
~ 7.2lb-ft)
|
|
|
|
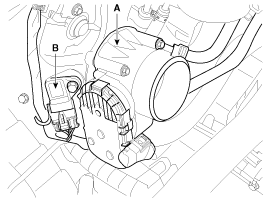
5. |
Remove the ETC (Electronic throttle control) module
(A) and MAPS (Manifold absolute pressure sensor & IATS (Intake air temperature
sensor) (B).
Tightening torque:9.8 ~ 11.8 N.m (1.0 ~ 1.2 kgf.m, 7.2 ~ 8.7
lb-ft)
|
|
|
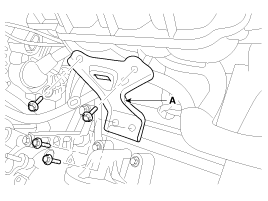
6. |
Remove the intake manifold stay (A).
Tightening torque:18.6 ~ 23.5 N.m (1.9 ~ 2.4 kgf.m, 13.7 ~
17.4 lb-ft)
|
|
|
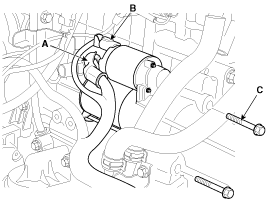
7. |
Disconnect the starter cable (A) from the B terminal
on the solenoid, then disconnect the connector (B) from the S terminal. |
|
8. |
Remove the 2 bolts (C) holding the starter, then
remove the starter.
Tightening torque
:42.2 ~ 53.9N.m (4.3 ~ 5.5kgf.m, 31.1 ~ 39.8lb-ft)
|
|
|
9. |
Installation is the reverse of removal. |
1.
Disconnect the M-terminal (A) on the magnet switch
assembly (B).[REMY]
[VALEO]
2.
After loosening the screws (A), detach the magne ...
See also:
A/C Pressure Transducer. Description and Operation
Description
A/C pressure transducer convert the pressure value of high pressure line into voltage
value after measure it. By converted voltage value, engine ECU controls cooling
fan by operating ...
Inspection
1.
Turn ignition switch OFF.
2.
Disconnect the oil temperature
sensor connector.
3.
Measure resistance between sensor
signal terminal and sensor g ...
Replacement
1.
Disconnect the battery negative
cable from the battery and then wait for at least 30 seconds.
2.
Turn the steering wheel so that
the front wheels can face straight ...

 Disassembly