 Kia Optima: Inspection
| 1. |
Check-points upon head lamp failure
(HID)
| (1) |
Check the battery voltage.
(Low beam will be on when the battery voltage above 9V.) |
| (2) |
Check the fuse and relay. |
| (3) |
Check the polarity of
ballast. (If the polarity are changed, low beam doesn't lighten) |
| (4) |
Check the bulb connector
securely. |
| (5) |
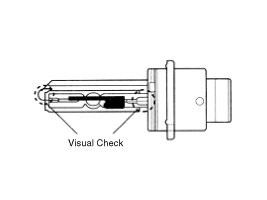
Visually bulb checking
(no filament): damaged glass, damaged for upper parts and lower
parts of glass tube. |
| (6) |
After (1)~(5), replace
the ballast and the ignitor. (ballast assembly).
|
If a headlamp goes out after a period of operation but will
immediately relights when the headlamp switch is cycled
it is likely the HID lamp needs to be replaced. |
|
|
| 2. |
Service procedure and warning
(HID)
No.
|
Item
|
Service procedures
|
Warning
|
Remarks
|
1
|
Replacement of lamp assembly
|
| 1. |
Disconnect the
power connector from the lamp. |
| 2. |
Remove and replace
the lamp assembly. |
| 3. |
Connect the power
connector. |
|
| ŌĆó
|
Disconnect the
head lamp power connector to avoid high voltage. |
|
| ŌĆó
|
Other description
is the same as the halogen bulbs. |
|
2
|
Replacement of the Bulb
|
| 1. |
Disconnect the
power connector from the lamp. (head lamp, turn signal,
head lamp leveling device) |
| 2. |
Remove the lamp
assembly. |
| 3. |
Remove the ballast
and dust cover. |
| 4. |
Remove the bulb
socket and replace the bulb. |
| 5. |
Installation
is the reverse of removal. |
|
| ŌĆó
|
Disconnect the
head lamp power connector to avoid high voltage. |
| ŌĆó
|
Be careful not
to damage the bulb and use genuine bulbs only. |
| ŌĆó
|
Do not apply
excessive force and fit it correctly. |
|
|
3
|
Replacement of the Ballast (with built-in ignitor)
|
| 1. |
Disconnect the
power connector from the lamp. |
| 2. |
Remove the lamp
and then the ballast and the dust cover. |
| 3. |
Remove the head
lamp leveling device and then the bulb socket. |
| 4. |
Connect the bulb
socket on the replacement ballast and install the leveling
device. |
| 5. |
Installation
is the reverse of removal. |
|
| ŌĆó
|
Disconnect the
head lamp power connector to avoid high voltage. |
|
| ŌĆó
|
Replace the ballast
only and install the used lamp. |
| ŌĆó
|
Replace the sub
assembly except the ballast. |
|
4
|
Others
|
| 1. |
Power supply
should be according to the rated capacity. |
| 2. |
Use the rated
fuse and wire. |
| 3. |
Bulb socket shall
be free from moisture or dirt. |
| 4. |
Do not apply
the ballast severe shock, water, or extreme |
|
| ŌĆó
|
All parts should
be serviced only at specified service centers. |
|
| ŌĆó
|
HID lamp should
not be installed on other cars (Dangerous, fire may occur.) |
|
|
HID lamp shall not be used on other cars.(Fire may occur.) Fire
may occur when HID lamp initially lights due to the fact that arc-discharge
generates high voltage (max. 30,000V) and high current (12-13A),
and are different from the halogen lamp specification.
|
|
| 3. |
Understanding of color change
by replacement of HID bulb.
| (1) |
The cause of HID color
change. (Change of color is HID feature)
| A. |
The change of
color occur during mixing three Elements in the HID bulb.
|
| B. |
Color Coordinates
by Lifetime
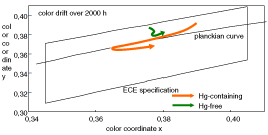
|
| C. |
Chemical compounds
in an arc tube : |
| 1. |
Xenon gas(an
inert gas , protection of arc tube) |
| 2. |
Mercury( increase
voltage, protection of arc tube, blue in the first 3 second
) |
| ŌĆó
|
Natrium(Yellow)
: 0.12mg |
| ŌĆó
|
Scandium(Blue)
: 0.06mg |
| ŌĆó
|
Iodine(Halogen)
: 0.02mg |
|
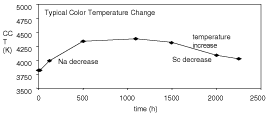
| (2) |
Change of Color by Lighting
Up Time
| A. |
It needs 4 seconds
at least for stabilization. At first, you can see the
blue for 3 seconds because of Mercury.
|
| B. |
After stabilization,
change of color occur by metal halide. |
| ŌĆó
|
0 Hour : Yellow(
Na is more than Sc. ) |
| ŌĆó
|
10 Hour : Bright
Blue (Na and Sc are similar ratio.) |
| ŌĆó
|
1000Hour more
: Blue ( Sc is more than Na.) |
| C. |
The end of lifetime
: When HID used up Natrium and Scandium, a beam of light
will be dark suddenly. so you can see the red, purple
and turn on and off.
|
|
|
Characteristic
| 1. |
Durable for vibration as there
is no filament. |
| 2. |
HID lamp had a more long life
than halogen lamp. |
| 3. |
Does not operate if polarity
is changed. |
| 4. |
Operating input voltage : 9-16V |
1.
Disconnect the negative (-) battery
terminal.
2.
Remove the front bumper.(Refer
to the BD group - "Front bumper")
3.
Loosening the he ...
See also:
Inspection
Sprockets, Chain Tensioner, Chain Guide, Chain Tensioner Arm
1.
Check the camshaft sprocket and
crankshaft sprocket for abnormal wear, cracks, or damage. Replace as necessary.
...
Cargo net
To keep items from shifting in the trunk, you can use the four rings located
in the trunk to attach the cargo net.
CAUTION
Do not put fragile, bulky or excessive items into cargo net. The i ...
Removal
Parking Assist Sensor
1.
Disconnect the negative (-) battery
terminal.
2.
Remove the rear bumper.(Refer
to the BD group - "Rear bumper")
3.
...

 Removal