 Kia Optima: Replacement
Trunk Lid Assembly Replacement
| ŌĆó |
When removing and installing
the trunk lid, an assistant is necessary. |
| ŌĆó |
Wear gloves to protect
hands from injury. |
|
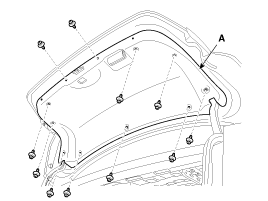
| 1. |
Loosen the trunk inside handle
(A) mounting screws.

|
| 2. |
Detach the clips, then remove
the trunk lid trim (A).
|
| 3. |
Disconnect wiring (B) and connectors. |
| 4. |
After loosening the mounting
bolts, then remove the trunk lid (A).
Tightening torque:6.9~8.8
N.m (0.7~0.9 kgf.m, 5.1~6.5 lb-ft)
|

|
| 5. |
Installation is the reverse of
removal.
| ŌĆó
|
Replace any damaged
clips. |
|
|
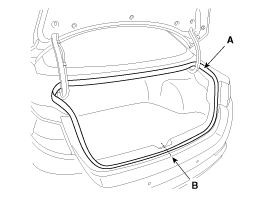
Trunk Lid Weatherstrip Replacement
| 1. |
Remove the trunk lid weatherstrip
(A).
| ŌĆó
|
Do not apply
sealant to the body. |
|
|
| 2. |
Installation is the reverse of
removal.
| ŌĆó
|
Install the weatherstrip
aligned with canter line (B). |
|
|
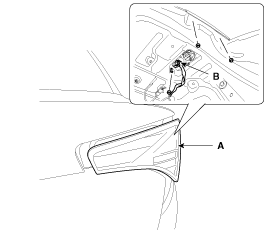
Trunk Lid Latch Replacement
| 1. |
Remove the trunk lid trim. |
| 2. |
Disconnect the trunk lid latch
connector (A). |
| 3. |
Disconnect the cable (B), then
loosen the latch assembly (C) mounting bolts and remove.
Tightening torque:6.9~10.8
N.m (0.7~1.1 kgf.m, 5.1~8.0 lb-ft)
|

|
| 4. |
Installation is the reverse of
removal.
| ŌĆó
|
Make sure the
trunk lid locks/unlocks and opens/closes properly. |
|
|
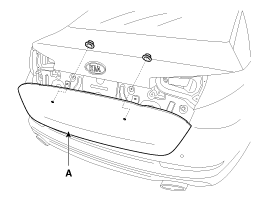
Trunk Lid Back Panel Replacement
| ŌĆó |
When prying with a flat-tip
screwdriver, wrap it with protective tape, and apply protective
tape around the related parts, to prevent damage. |
| ŌĆó |
Put on gloves to protect
your hands. |
|
| 1. |
Remove the trunk lid trim. |
| 2. |
After loosening the mounting
nuts, then disconnect the rear combination lamp connector (B). |
| 3. |
Remove the rear combination lamp
(A).
|
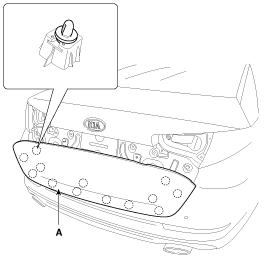
| 4. |
Loosen the trunk lid back panel
(A) mounting nuts.
|
| 5. |
Using a screwdriver or remover,
remove the trunk lid back panel (A).
|
| 6. |
Installation is the reverse of
removal.
| ŌĆó
|
Replace any damaged
clips. |
|
|
1.
After loosening the trunk lid
hinge (A) mounting bolt, adjust the trunk lid by moving it up or down, or
right or left.
2.
Adjust the trunk lid height by
turnin ...
See also:
Tire Size Designation
A tireŌĆÖs sidewall is marked with a tire size designation. You will need this
information when selecting replacement tires for your car. The following explains
what the letters and numbers in the ...
Installing a child restraint on a front passengerŌĆÖs seat is forbidden
Never place a rear-facing child restraint in the front passengerŌĆÖs seat. If the
air bag deploys, it would impact the rear-facing child restraint, causing serious
or fatal injury.
In addition, ...
Replacement
The injector combustion seal should be replaced new one to
prevent leakage after removing the injector.
1.
Remove the combustion seal (A) with a wire cutter.
...

 Adjustment