 Kia Optima: Removal
| 1. |
Make sure vehicle does not roll
before setting room side shift lever and T/M side manual control lever to
"N" position. |
| 2. |
Remove the battery and the battery
tray. (Refer to "Charging system" in EE group.) |
| 3. |
Remove the air cleaner assembly.
(Refer to "Intake manifold" in EM group.) |
| 4. |
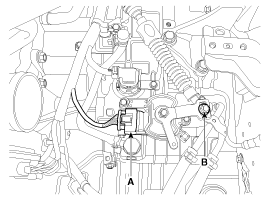
Remove the shift cable mounting
nut (B). |
| 5. |
Disconnect the inhibitor switch
connector (A).
|
| 6. |
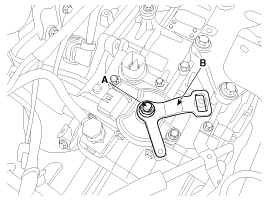
Remove the manual control lever
(B) and the washer after removing a nut (A).
|
When installing, affix the manual control lever and the inhibitor
switch with Ø5mm (0.1969in.). Then tighten the inhibitor assembly
mounting bolts. |
|
| 7. |
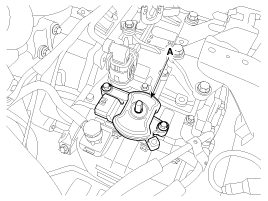
Remove the inhibitor assembly
(A) after removing the bolts (2ea).
Tightening torque:9.8 ~
11.8 N.m (1.0 ~ 1.2 kgf.m, 7.2 ~ 8.7 lb-ft)
|
|
When installing, tighten the inhibitor assembly mounting bolt lightly,
so that necessary adjustments can be made. Tighten to specifications. |
|
1.
Installation is the reverse of
removal.
...
See also:
Inspection
1.
Check signal waveform of Input
& output speed sensor using the GDS.
Specification: Refer to "Signal
Wave Form" section.
...
Schematic
Diagrams
Schematic Diagram
...
Pre-tensioner seat belt
Your vehicle is equipped with driver's and front passenger's pre-tensioner seat
belts. The purpose of the pre-tensioner is to make sure that the seat belts fit
tightly against the occupa ...

 Installation