 Kia Optima: Installation
| 1. |
Install the wiper motor. |
| 2. |
Install the crank arm.
Tighting torque:24.5 ~
26.4Nm (2.5 ~ 2.7, kgf.m, 18.0 ~ 19.5 lbf.ft)
|
|
To install the wiper motor crank arm, make sure that the linkage
is aligned with the crank arm in straight line and set the angle
of each linkages exactly. |
|
| 3. |
Install the lower and upper linkage
to the wiper motor crank arm.
|
To install the wiper motor crank arm, make sure that the linkage
is aligned with the crank arm in straight line and set the angle
of each linkages exactly.
Be careful not to bend the linkage.
|
|
| 4. |
Install the wiper motor and linkage
assembly and then connect the wiper motor connector.
Tighting torque:7 ~ 11Nm
(0.7 ~ 1.1, kgf.m, 5.0 ~ 7.9 lbf.ft)
|
|
| 5. |
Install the cowl top cover. |
| 6. |
Install the windshield wiper
arm and blade.
Tighting torque:22.5 ~
26.4 Nm (2.3 ~ 2.7 kgf.m, 16.6 ~ 21.7 lbf.ft)
|
| -
|
The windshield
wiper motor must be cycled to make sure that it is in the
auto stop position. If necessary, adjust the wiper arm
and blade.
|
|
|
| 7. |
Install the wiper arm and blade
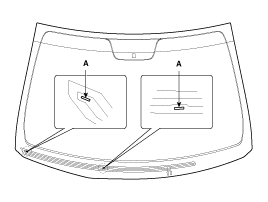
to the auto stop position. A : Auto stop position (Blade)
|
| 8. |
Set the cowl top cover on the
specified spray position.
| -
|
When you turn
on the washer, confirm 50% or more of washer fluid lands
within the spray area. |
| -
|
If the spray
area is not within the standard positions, adjust the nozzle(s). |
|
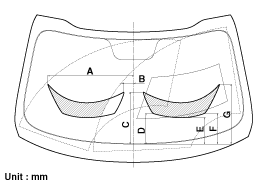
Specified position
|
Distance (in)
|
Distance (mm)
|
A
|
20.24
|
514.3
|
B
|
2.46
|
62.6
|
C
|
12.33
|
313.3
|
D
|
7.39
|
187.7
|
E
|
6.41
|
162.8
|
F
|
7.32
|
186
|
G
|
13.56
|
344.6
|
|
1.
Loosen the windshield wiper arm
nut (B) after removing a wiper cap (A).
2.
Remove the windshield wiper arm
and blade (A).
3.
If nec ...
Speed Operation Check
1.
Remove the connector (A) from
the wiper motor.
NO
Description
NO
Description
...
See also:
Removal
1.
Loosen the windshield wiper arm
nut (B) after removing a wiper cap (A).
2.
Remove the windshield wiper arm
and blade (A).
3.
If nec ...
Inspection
Radiator Cap Testing
1.
Remove the radiator cap, wet
its seal with engine coolant, and then install it on a pressure tester.
2.
Apply a pressure of 93.16 ~ 122.58k ...
Variable Intermittent Wipers
Set the lever to the INT position and choose the desired wiper interval by turning
the ring. ...
 Removal
 Inspection