 Kia Optima: Headlight Aiming Adjustment
Before performing aiming adjustment, make sure of the following.
1. Keep all tires inflated to the correct pressure.
2. Place the vehicle on level ground and press the front bumper & rear bumper down
several times.
3. See that the vehicle is unloaded (except for full levels of coolant, engine oil
and fuel, and spare tire, jack, and tools). Have the driver or equivalent weight
in driverŌĆÖs seat.
4. Clean the head light lens and turn on the headlight (Low beam).
5. Open the hood.
6. Draw the vertical line (through the center of each headlight) and the horizontal
line (through the center of each headlight) on the aiming screen.
1) Horizontal line dimension from ground: 24.72 in (628 mm)
2) Distance between each vertical line : 49.17 in (1,306 mm)
And then, draw the parallel line at 1.18 in (30 mm) place under the horizontal line.
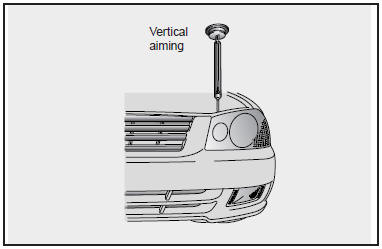
7. Adjust each cut-off line of the low beam to the parallel line with a Phillips
screwdriver VERTICAL AIMING.
 Cleaning the Interior Window Glass
If the interior glass surfaces of the vehicle become fogged (that is, covered
with an oily, greasy or waxy film), they should be cleaned with glass cleaner. Follow
the directions on the glass clea ...
 Adjustment After Headlight Assembly Replacement
If the vehicle has had front body repair and the headlight assembly has been
replaced, the headlight aiming should be checked using the aiming screen as shown
in the illustration. Turn on the he ...
See also:
Water pump. Repair procedures
...
Relay Box (Engine Compartment). Repair procedures
Inspection
Power Relay Test (Type A)
-
Do not use pliers.
-
Pliers will damage the
re ...
Compressor Oil. Repair procedures
Oil Specification
1.
The HFC-134a system requires
synthetic (PAG) compressor oil whereas the R-12 system requires mineral
compressor oil. The two oils must never be mixed.
...
Categories
Kia Optima Manuals
- Kia Optima DL3 2019-2026 Owners Manual
- Kia Optima DL3 2019-2026 Service and Repair Manual
- Kia Optima TF 2011-{2019} Owners Manual
- Kia Optima TF 2011-2026 Service Manual
- Kia Optima MS/Magentis 2000-2005 Owners Manual
