 Kia Optima: Disassembly
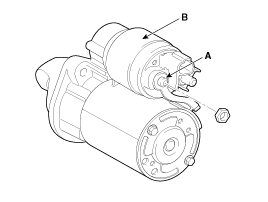
| 1. |
Disconnect the M-terminal (A) on the magnet switch
assembly (B). [REMY]
|
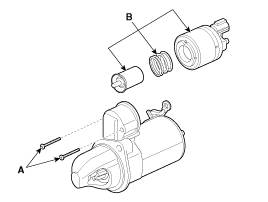
| 2. |
After loosening the screws (A), detach the magnet
switch assembly (B). [REMY]
|
| 3. |
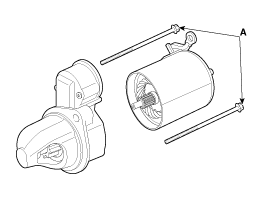
Loosen the through bolts (A). [REMY]
|
| 4. |
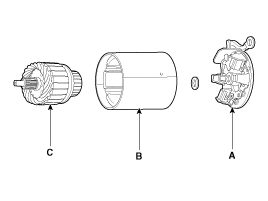
Remove the brush holder assembly (A), yoke (B) and
armature (C). [REMY]
|
| 5. |
REMY : Remove the lever plate (B) and lever packing
(A).
|
| 6. |
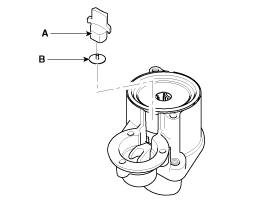
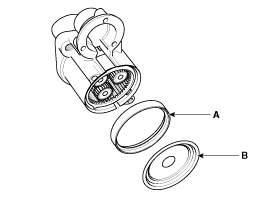
Remove the packing (A) and shield (B). (REMY only)
|
| 7. |
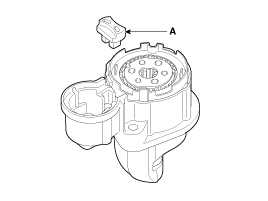
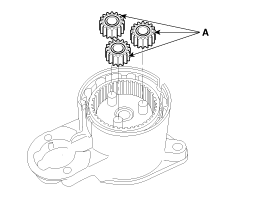
Disconnect the planet gear (A). (REMY only)
|
| 8. |
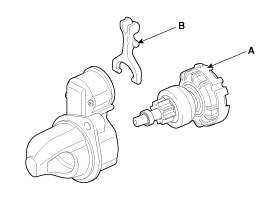
Disconnect the planet shaft assembly (or reducer
assembly) (A) and lever (B). [REMY]
|
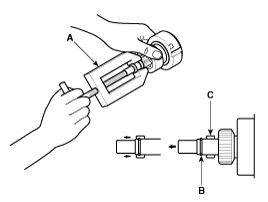
| 9. |
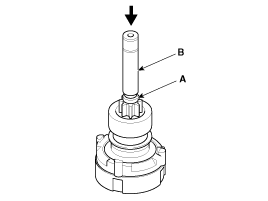
Press the stopper (A) using a socket (B).
|
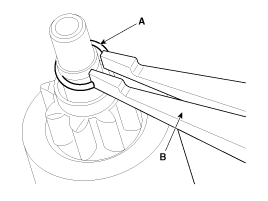
| 10. |
After removing the stop ring (A) using stop ring
pliers (B).
|
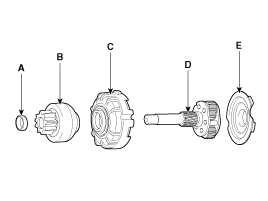
| 11. |
Disconnect the stopper (A), overrunning clutch (B),
internal gear (C), planet shaft (or drive shaft) (D) and/or gasket sheet
(E). [REMY]
|
| 12. |
Reassembly is the reverse of disassembly.
|
 Removal and Installation
1.
Remove the engine cover.
2.
Disconnect the battery negative terminal (A).
Tightening torque
:4.0 ~ 6.0N.m (0.4 ~ 0.6kgf.m, 3.0 ~ 4.4lb-ft) ...
 Inspection
Armature Inspection
And Test
1.
Remove the starter.
2.
Disassemble the starter as shown at the beginning
of this procedure.
...
See also:
Inspection
1.
Turn ignition switch OFF.
2.
Disconnect the oil temperature
sensor connector.
3.
Measure resistance between sensor
signal terminal and sensor g ...
Fuses
A vehicleŌĆÖs electrical system is protected from electrical overload damage by
fuses.
This vehicle has two fuse panels, one located in the driverŌĆÖs side kick panel,
the other in the engine c ...
Removal
1.
Remove the rear wheel & tire.
Tightening torque:88.3
~ 107.9N.m(9.0 ~ 11.0kgf.m, 65.1 ~ 79.6lb-ft)
...
Copyright ® www.kiopman.com 2026

![[VALEO]](images/books/849/syfee0005n.gif)
![[VALEO]](images/books/849/syfee0006n.gif)
![[VALEO]](images/books/849/syfee0007n.gif)
![[VALEO]](images/books/849/syfee0008n.gif)
![[VALEO]](images/books/849/syfee0011n.gif)
![[VALEO]](images/books/849/syfee0205n.gif)
