 Kia Optima: Checking the Automatic Transaxle Fluid Level
The automatic transaxle fluid level should be checked regularly.
The volume of the transaxle fluid changes with temperature. Although it is best to check the level after having driven the vehicle for at least 30 minutes, the level can be checked after warming the fluid using the procedure below.
✽ NOTICE
- Low transaxle fluid level causes transaxle/transaxle slippage. Overfilling can cause foaming, loss of fluid and transaxle malfunction.
- The use of a non-specified fluid could result in transaxle malfunction and failure.
![]() WARNING - Parking Brake
WARNING - Parking Brake
To avoid sudden movement of the vehicle, set the parking brake and depress the brake pedal before moving the shift lever.
1. Park the vehicle on level ground and firmly set the parking brake.
2. Allow the engine to idle for about 2 minutes.
3. Depress the brake pedal and move the shift lever slowly through all ranges then set it in N (Neutral).
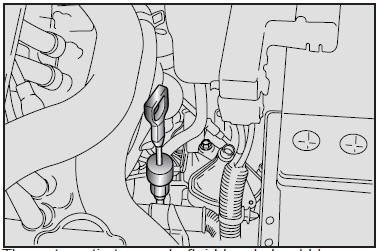
4. With the engine still idling, pull out the dipstick, wipe it clean and reinsert it fully.
5. Pull out the dipstick again and check the fluid level.
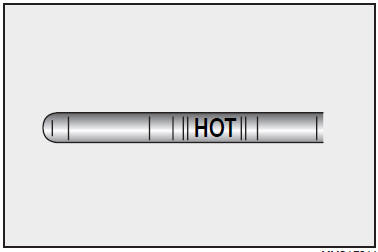
Using the hot fluid scale:
If the vehicle has been driven and the fluid is warmed to the normal operating temperature of approximately 158~176┬░F (70~80┬░C), the fluid level should be within ŌĆ£HOTŌĆØ range.
- Use the cold scale as a rough reference only.
- If the outside temperature is lower than 68ºF (20┬░C), start the engine and measure the fluid level after letting the engine reach operating temperature.
- If the vehicle has been driven for an extended period at high speeds or in city traffic in hot weather, it is usually best to measure the fluid level after stopping the engine and allowing the fluid to cool for 30 minutes.
When inserting the dipstick, be sure to insert it completely. When adding fluid, measure frequently with the dipstick to make sure the fluid level does not go above the Full position. Do not overfill.
Use only the specified automatic transaxle fluid. (Refer to ŌĆ£Recommended LubricantsŌĆØ later in this section.)

 Changing the Automatic Transaxle Fluid
1. Raise and suitably support the vehicle.
2. Remove the drain plug located at the bottom center front of the transaxle pan.
3. After the oil has drained, completely install a new washer on the plug ...
See also:
Recirculated Air position
When the air intake control switch is depressed (switch indicator illuminates),
almost all outside air flow into the vehicle is shut off and air inside the vehicle
is recirculated.
This position ...
Interior overview
1. Driver position memory system* 2. Door lock/unlock button 3. Outside rearview
mirror control switch* 4. Power window lock button* 5. Power window switches*
6. Central door lock switch* 7. Ins ...
Driving in the Rain
Rain and wet roads can make driving dangerous, especially if youŌĆÖre not prepared
for the slick pavement. Here are a few things to consider when driving in the rain:
A heavy rainfall will make ...
Categories
Kia Optima Manuals
- Kia Optima DL3 2019-2026 Owners Manual
- Kia Optima DL3 2019-2026 Service and Repair Manual
- Kia Optima TF 2011-{2019} Owners Manual
- Kia Optima TF 2011-2026 Service Manual
- Kia Optima MS/Magentis 2000-2005 Owners Manual
