 Kia Optima: Tire Replacement
1. Park on a level surface and set the parking brake firmly.
2. For manual transaxle vehicles, shift into R (Reverse). For automatic transaxle vehicles, shift into P (Park).
3. Activate the hazard warning flasher.
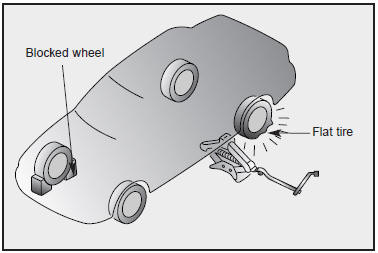
4. Remove the wheel lug nut wrench, jack, jack handle, and spare tire from the vehicle.
5. Block both the front and rear of the wheel that is diagonally opposite the jack position.
6. For models with alloy wheels, remove the center cap.
![]() WARNING - Changing a Tire
WARNING - Changing a Tire
To prevent vehicle movements while changing a tire, always set the parking brake fully, and always block the wheel diagonally opposite the wheel being changed.
7. Loosen the wheel nuts counterclockwise one turn each, but do not remove any nut until the tire has been raised off the ground.
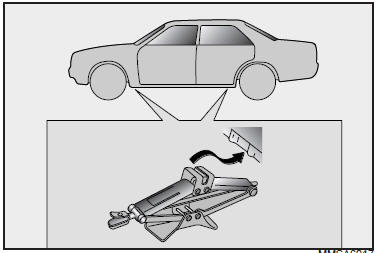
8. Place the jack at the front or rear jacking position closest to the tire you are changing. Place the jack at the designated locations under the frame. The jacking positions are plates welded to the frame with two tabs and a raised dot to index with the jack.
![]() WARNING - Jack Location
WARNING - Jack Location
To reduce the possibility of injury, be sure to use only the jack provided with the vehicle and in the correct jack position; never use any other part of the vehicle for jack support.
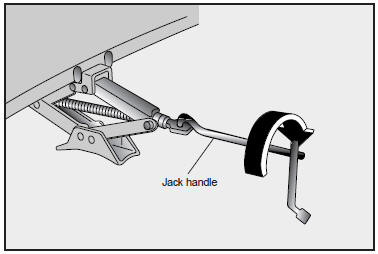
9. Insert the jack handle into the jack and turn it clockwise, raising the vehicle until the tire just clears the ground. This measurement is approximately 1.2 in (30mm). Before removing the wheel lug nuts, make sure the vehicle is stable and that there is no chance for movement or slippage.
10.Remove the wheel lug nuts by turning them counterclockwise, then remove the wheel.
11. Mount the spare tire into position and tighten the wheel nuts by hand. Install the wheel lug nuts with the beveled edge inward.
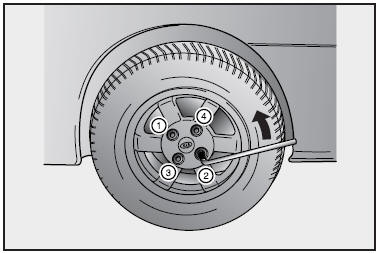
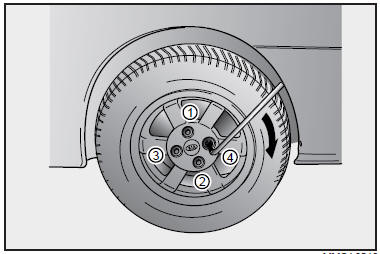
12. Turn the jack handle counterclockwise and lower the vehicle until it touches the ground. Tighten the wheel lug nuts firmly in a ŌĆ£XŌĆØ pattern as indicated in the diagram.
Once the lug nuts have been tightened, lower the vehicle fully to the ground and continue to tighten the lug nuts until they are fully secured.
If you are unsure of the tightness of the wheel lug nuts, have them checked at the nearest service station. The specified tightening torque is 76 ft. lb. (103 NŌĆóm).
✻ NOTICE
Your vehicle has metric threads on the wheel studs and nuts. When changing a wheel, make sure that the same nuts removed are reinstalled ŌĆō or, if replaced, that nuts with metric threads of the same chamfer configuration are used. Installation of a nonmetric thread nut on a metric stud or viceversa will not secure the wheel to the hub properly and will damage the stud requiring replacement.. Note that most U.S. lug nuts do not have metric threads. Be sure to use extreme care in checking for thread style before installing aftermarket lug nuts or wheels. If in doubt, consult an Authorized Kia Dealer.
![]() WARNING - Wheel Studs
WARNING - Wheel Studs
If the studs are damaged, they may lose their ability to retain the wheel. This can lead to the loss of the wheel, loss of control and a collision.
To prevent the jack, jack handle, wheel lug nut, wrench and spare tire from rattling while the vehicle is in motion, store them properly.
 Changing Tires Jacking Instructions
The jack is provided for emergency tire changing only.
Follow jacking instructions to reduce the possibility of personal injury.
WARNING - Changing Tires
Never attempt vehicle repairs in th ...
 Maintenance
...
See also:
Instrument Cluster. Description and Operation
Description
ECO driving system
This system is designed to encourage eco-driving by providing real-time feedback
to the driver.
The ECO indicator light assists you to drive in the most economical ...
Child restraint anchorage position
Your vehicle is equipped with an anchor for securing the tether strap of a child
restraint system (child seat).
The child restraint anchor fittings are installed on the shelf behind the rear
se ...
Categories
Kia Optima Manuals
- Kia Optima DL3 2019-2026 Owners Manual
- Kia Optima DL3 2019-2026 Service and Repair Manual
- Kia Optima TF 2011-{2019} Owners Manual
- Kia Optima TF 2011-2026 Service Manual
- Kia Optima MS/Magentis 2000-2005 Owners Manual
