 Kia Optima: Removal and Installation
| 1. |
Disconnect the battery terminals.
(Refer to Engine and transaxle assembly in this group) |
| 2. |
Remove the air cleaner assembly
and the intercooler inlet/outlet hoses. (Refer to Engine and transaxle assembly
in this group) |
| 3. |
Remove the battery and battery
tray. (Refer to Engine and transaxle assembly in this group) |
| 4. |
Remove the under covers. (Refer
to Engine and transaxle assembly in this group) |
| 5. |
Loosen the drain plug, and drain
the engine coolant. Remove the radiator cap to drain with speed. |
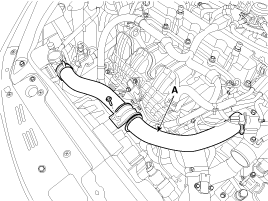
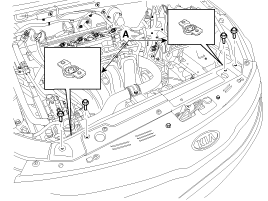
| 6. |
Disconnect the radiator upper
hose (A).
|
| 7. |
Disconnect the lower hose (A),
the fan motor connector (B) and then remove the cooling fan assembly (C).
Tightening torque :4.9
~ 7.8 N.m (0.5 ~ 0.8 kgf.m, 3.6 ~ 5.8 lb-ft)
|
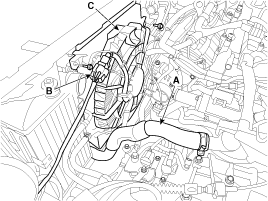
|
| 8. |
Disconnect the ATF cooler hoses
(A/T only). (Refer to AT group)
|
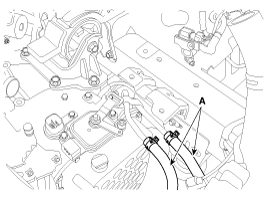
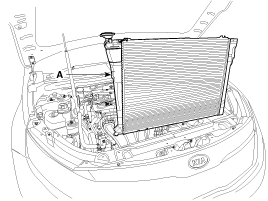
| 9. |
Disconnect the over flow hose
(A) from the radiator.
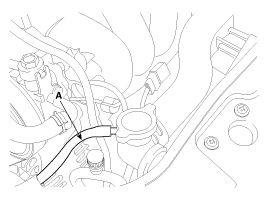
|
| 10. |
Remove the radiator mounting
brackets (A).
Tightening torque:3.9 ~
5.9 N.m (0.4 ~ 0.6 kgf.m, 2.9 ~ 4.3 lb-ft)
|
|
| 11. |
Separate the condenser from the
radiator and then remove the radiator assembly (A).
|
| 12. |
Installation is the reverse order
of removal. |
| 13. |
Fill the radiator with coolant
and check for leaks.
| ŌĆó
|
Bleed air from
the cooling system. |
| -
|
Start engine
and let it run until it warms up. (Until the radiator fan
operates 3 or 4 times.) |
| -
|
Turn off engine.
Check the coolant level and add coolant if needed. This
will allow trapped air to be removed from the cooling system.
|
| -
|
Put the radiator
cap on tightly, then run engine again and check for leaks. |
|
|
Radiator Cap Testing
1.
Remove the radiator cap, wet
its seal with engine coolant, and then install it on a pressure tester.
2.
Apply a pressure of 93.16 ~ 122.58k ...
See also:
Replacement
1.
Disconnect the negative (-) battery
terminal.
2.
Remove the head lamp assembly.
(Refer to the head lamp)
3.
Remove the head lamp leveling
ac ...
Knock Sensor (KS). Description and Operation
Description
Knocking is a phenomenon characterized by undesirable vibration
and noise and can cause engine damage. Knock Sensor (KS) is installed on the
cylinder block and senses engine knockin ...
Removal
Replacing an on/off solenoid valve (SS-A, SS-B) does not require additional
hydraulic pressure adjustment; however, the hydraulic pre ...

 Inspection