 Kia Optima: Front wheel alignment
Prior to inspection, make sure that the front suspension and steering system are in normal operating condition and that the tires are inflated to the specified pressure. |
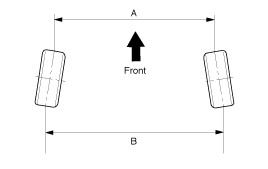
B - A. 0: Toe in (+) B - A < 0: Toe out (-) |
| 1. | Loosen the tie rod end lock nut. |
| 2. | Remove the bellows clip to prevent the bellows from being twisted. |
| 3. | Adjust the toe by screwing or
unscrewing the tie rod. Toe adjustment should be made by turning the right
and left tie rods by the same amount.
|
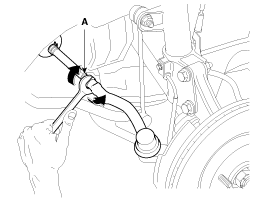
| 4. | When completing the toe adjustment,
install the bellows clip and tighten the tie rod end lock nut to specified
torque.
|
Camber and Caster are pre-set at the factory, so they do not need to be adjusted. If the camber and caster are not within the standard value, replace or repair the damaged parts and then inspect again.
Camber angle: -0.5┬░ ┬▒ 0.5┬░ |
Caster angle : 4.44┬░ ┬▒ 0.5┬░ |

 Rear wheel alignment
When using a commercially available computerized wheel alignment equipment
to inspect the rear wheel alignment, always position the v ...
See also:
Cruise Control Switch. Schematic Diagrams
Circuit Diagram
...
Do not use methanol
Fuels containing methanol (wood alcohol) should not be used in your vehicle.
This type of fuel can reduce vehicle performance and damage components of the fuel
system. ...
Inspection
1.
Connect the GDS on the Data Link Connector (DLC).
2.
Turn the ignition switch ON.
3.
Measure the output voltage of the APS 1 and 2 at
C.T ...
Categories
Kia Optima Manuals
- Kia Optima DL3 2019-2026 Owners Manual
- Kia Optima DL3 2019-2026 Service and Repair Manual
- Kia Optima TF 2011-{2019} Owners Manual
- Kia Optima TF 2011-2026 Service Manual
- Kia Optima MS/Magentis 2000-2005 Owners Manual
