 Kia Optima: Starter
Relay. Repair procedures
Inspection
|
1. |
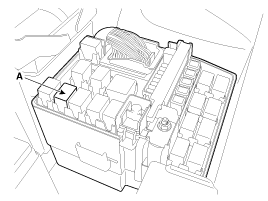
Remove the fuse box cover. |
|
2. |
Remove the starter relay (A).

|
|
3. |
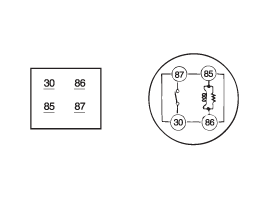
Using an ohmmeter, check that there is continuity
between each terminal.
Terminal
|
Continuity
|
30 - 87
|
NO
|
85 - 86
|
YES
|
|
|
4. |
Apply 12V to terminal 85 and ground to terminal 86. Check for continuity between terminals 30 and 87.

|
|
5. |
If there is no continuity, replace the starter relay. |
|
6. |
Install the starter relay. |
|
7. |
Install the fuse box cover. |
Armature Inspection
And Test
1.
Remove the starter.
2.
Disassemble the starter as shown at the beginning
of this procedure.
...
See also:
Installation
1.
Apply a light coat of engine
oil to the oil cooler packing surface (A), and then install the oil cooler
with fix bolt (B).
Tightening torque:44.1
~ 53.9 N.m (4.5 ~ ...
Recommended Shifting
Drive the vehicle in the highest gear that allows the engine to run and accelerate
smoothly without hesitating or stalling. This will give you the most efficient fuel
economy and emission control. ...
Front Seat. Components and Components Location
Components
1. Headrest
2. Headrest guide
3. Front seat back cover
4. Front seat back warmer
5. Front seat back frame
6. Front seat duct
7. Front seat back boa ...
 Kia Optima: Starter
Relay. Repair procedures
 Inspection


