 Kia Optima: Roof Trim. Repair procedures
Replacement
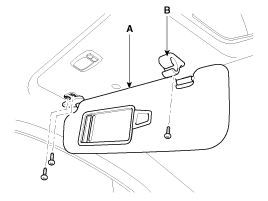
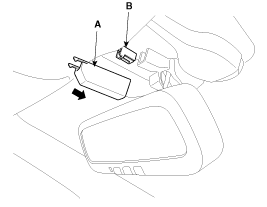
Sunvisor Replacement
| ŌĆó |
Use a plastic panel removal
tool to remove interior trim pieces to protect from marring the
surface. |
| ŌĆó |
Put on gloves to protect
your hands. |
|
| 1. |
Loosen the mounting screws, then
remove the sunvisor (A) and retainer (B).
|
| 2. |
Installation is the reverse of
removal. |
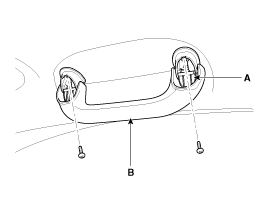
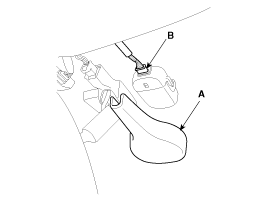
Assist Handle Replacement
| ŌĆó |
Use a plastic panel removal
tool to remove interior trim pieces to protect from marring the
surface. |
| ŌĆó |
Put on gloves to protect
your hands. |
|
| 1. |
Remove the covers (A) and screws,
then remove the assist handle (B).
|
| 2. |
Installation is the reverse of
removal. |
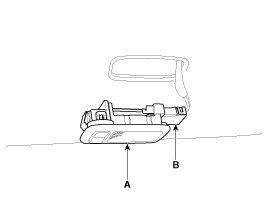
Room Lamp Replacement
| ŌĆó |
Use a plastic panel removal
tool to remove interior trim pieces to protect from marring the
surface. |
| ŌĆó |
Put on gloves to protect
your hands. |
|
| 1. |
Using a screwdriver or remover,
remove the room lamp cover (B). |
| 2. |
After loosening the mounting
screws, then remove the room lamp (A).
|
| 3. |
Disconnect the connector (A).
|
| 4. |
Installation is the reverse of
removal.
| ŌĆó
|
Make sure the
connectors are plugged in properly. |
|
|
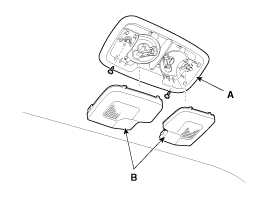
Vanity Lamp Replacement
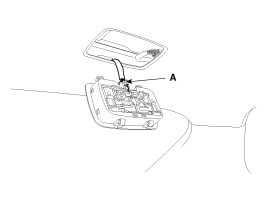
| 1. |
Using a screwdriver or remover,
remove the vanity lamp (A). |
| 2. |
Disconnect the vanity lamp connector
(B).
|
| 3. |
Installation is the reverse of
removal.
| ŌĆó
|
Make sure the
connector is plugged in properly. |
|
|
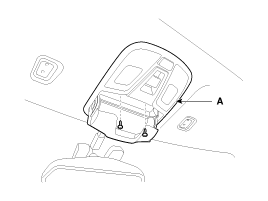
Overhead Console Replacement
| ŌĆó |
Use a plastic panel removal
tool to remove interior trim pieces to protect from marring the
surface. |
| ŌĆó |
Put on gloves to protect
your hands. |
|
| 1. |
After loosening the mounting
screws, then remove the overhead console assembly (A).
|
| 2. |
Disconnect the connectors (A).

|
| 3. |
Installation is the reverse of
removal.
| ŌĆó
|
Make sure the
connectors are plugged in properly. |
|
|
Roof Trim Replacement
| ŌĆó |
Put on gloves to protect
your hands. |
| ŌĆó |
Use a plastic panel removal
tool to remove interior trim pieces to protect from marring the
surface. |
| ŌĆó |
Take care not to bend
or scratch the trim and panels. |
|
| 1. |
Remove the following items:
| A. |
Front seat assembly
(Refer to the BD group - "Front Seat")
|
| B. |
Rear seat assembly
(Refer to the BD group - "Rear Seat")
|
| C. |
Front pillar trim (Refer
to the BD group - "Interior Trim")
|
| D. |
Front door scuff trim
& Rear door scuff trim (Refer to the BD group - "Interior Trim")
|
| E. |
Canter pillar lower trim
(Refer to the BD group - "Interior Trim")
|
| F. |
Canter pillar upper trim
(Refer to the BD group - "Interior Trim")
|
| G. |
Rear pillar trim (Refer
to the BD group - "Interior Trim")
|
| H. |
Package tray trim
(Refer to the BD group - "Interior Trim")
|
| N. |
Windshield glass (Refer
to the BD group - "Windshield Glass")
|
|
| 2. |
Remove the ECM mirror cover (A). |
| 3. |
Disconnect the ECM mirror connector
(B).
|
| 4. |
Remove the rain sensor cover
(A). |
| 5. |
Disconnect the rain sensor connector
(B).
|
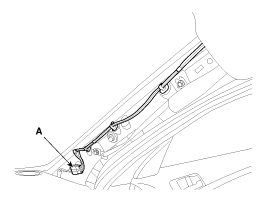
| 6. |
Disconnect the roof trim main
connectors (A). [Driver's]
![[Passenger's]](images/books/1521/stfbd1127d.gif)
[Passenger's]
|
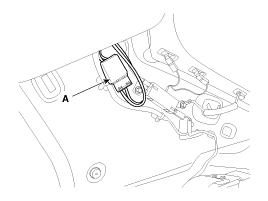
| 7. |
Disconnect the antenna connector
(A).
|
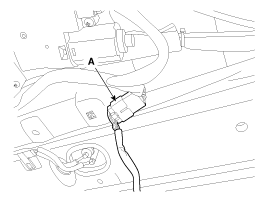
| 8. |
Disconnect the connector (A).
|
| 9. |
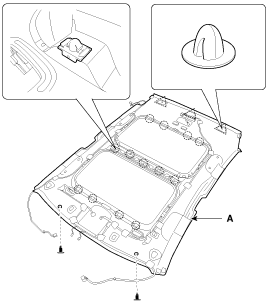
Using a clip remover, detach
the roof trim assembly mounting clips. |
| 10. |
Pull back the roof trim assembly
(A) through the place where the windshield glass was removed.
| ŌĆó
|
Take care not
to damage the roof trim when removing. |
|
|
| 11. |
Installation is the reverse of
removal.
| ŌĆó
|
Replace any damaged
clips. |
| ŌĆó
|
Make sure the
connector is plugged in properly. |
|
|
1. Roof trim
2. Sunvisor
3. Retainer
4. Assist handle bracket
...
Components
1. Front pillar trim
2. Center pillar upper trim
3. Center pillar lower trim
4. Rear pillar trim
5. Cowl side trim
6. Front door scuff trim
7. Rea ...
See also:
Manual climate control system
1. Fan speed control knob 2. Front windshield defroster button 3. Rear window
defroster button 4. Temperature control knob 5. Air conditioning button 6.
Mode selection button 7. Air intake contr ...
Installation
Side Repeater Lamp
1.
Install the bulb to the side
repeater lamp assembly.
2.
Install the side repeater lamp.
Door Mirror Turn Signal Lamp
1.
Install the do ...
Air conditioning
1.Select the mode. 2. Control the fan speed. 3. Control the air conditioning
knob.
However, selected, the outside air
position is not operated. ...
 Components [Panoramaroof]
 Interior Trim. Components and Components Location