 Kia Optima: Replacement
Head Lamp (Low)
| 1. |
Turn the head lamp switch off. |
| 2. |
Disconnect the power connector
from the lamp. |
| 3. |
Remove the head lamp (Low) cap. |
| 4. |
Disconnect the connector (A). |
| 5. |
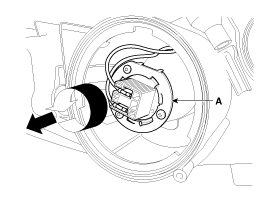
Turn the bulb and socket (A)
counter clockwise to remove the turn signal bulb.
|
| 6. |
Installation is the reverse of
removal. |
Head Lamp (Low)
| 1. |
Turn the head lamp switch off. |
| 2. |
Disconnect the power connector
from the lamp. |
| 3. |
Remove the head lamp (Low) cap. |
| 4. |
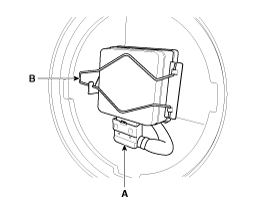
Remove the clip (B) and ignitor
connector (A) from the lamp assembly.
|
| 5. |
Remove the head lamp (Low) ignitor. |
| 6. |
Installation is the reverse of
removal.
|
Turn the head lamp switch off to avoid high voltage Be careful
not to damage the bulb and use genuine bulbs only
| ŌĆó
|
Do not apply
excessive force and fit it correctly. |
| ŌĆó
|
Confirm the bulb
locking |
|
|
Ballast
| 1. |
Turn the head lamp switch off. |
| 2. |
Remove the head lamp assembly. |
| 3. |
Disconnect the power connector
from the lamp. |
| 4. |
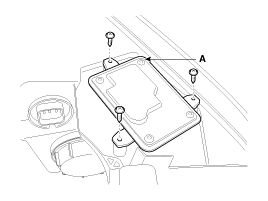
Remove the ballast (A) after
removing the screws (3EA) and connector.
|
Be careful not to be damaged when disconnecting the ballast connector. |
|
| 5. |
Installation is the reverse of
removal.
| ŌĆó
|
Turn the head
lamp switch off to avoid high voltage. |
|
| ŌĆó
|
HID lamp shall
not be used on other cars.(Fire may occur.) |
| ŌĆó
|
Fire may occur
when HID lamp initially lights due to the fact that arc-discharge
generates high voltage (max. 20,000V) and high current (12-13A),
and are different from the halogen lamp specification. |
| ŌĆó
|
Install the dust
cover after confirming the locking state between bulb and
bulb holder. |
| ŌĆó
|
When testing
the HID head lamp, turn the power on or off with switch
between power supply and lamp because of high voltage. |
| ŌĆó
|
Do not operate
the head lamp switch with the bulb not installed, because
it generates spark momently. |
|
|
Head lamp(High) bulb
| 1. |
Turn the head lamp power off. |
| 2. |
Disconnect the power connector
from the lamp. |
| 3. |
Remove the head lamp (High) cap. |
| 4. |
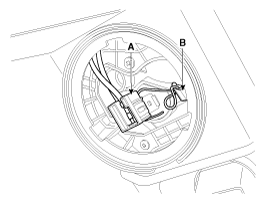
Remove the connector (A) and
fixing clip (B).
|
| 5. |
Remove the head lamp (High) bulb. |
| 6. |
Installation is the reverse of
removal. |
Side Marker Lamp
| 1. |
Turn the head lamp power off. |
| 2. |
Remove the lamp assembly. |
| 3. |
Turn the bulb socket (A) counterclockwise
to remove the bulb (B).
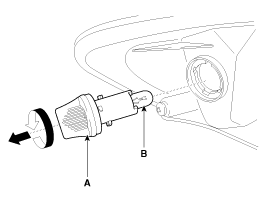
|
| 4. |
Installation is the reverse of
removal. |
<Mechanical aiming>
The head lamps should be aimed with the proper beam-setting equipment, and in accordance
with the equipment manufacturer's instructions.
...
See also:
Operation Principle
The CVVT has the mechanism rotating the rotor vane with hydraulic
force generated by the engine oil supplied to the advance or retard chamber
in accordance with the CVVT oil control valve contro ...
Interior A
Front pillar trim mounting hole (Ø12)
Front pillar trim mounting hole (Ø8.4)
Cowl cross ...
Components and Components Location
Component Location
1. Power door mirror
2. Power door mirror switch
3. Power folding mirror switch
...
 Kia Optima: Replacement
 Head Lamp Aiming Instructions


