 Kia Optima: Heater & A/C Control Unit(Dual). Components and Components Location
Components
| Control Panel |
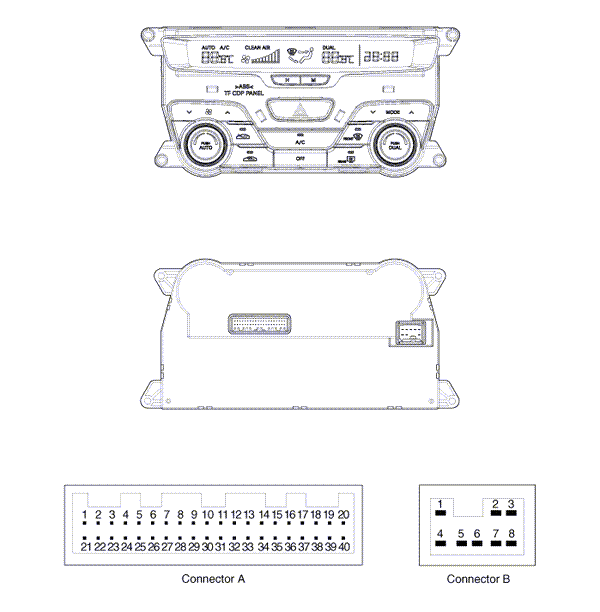
|
Connector |
PIN NO. |
Function |
Connector |
PIN NO. |
Function |
|
Connector(A) |
1 |
Tail (+) |
Connector(A) |
25 |
- |
|
2 |
Sensor REF (+5V) |
26 |
Ambient Sensor (+) |
||
|
3 |
Hazard Signal |
27 |
Incar Sensor (+) |
||
|
4 |
ACC |
28 |
Evaporator Sensor (+) |
||
|
5 |
Mode Actuator (VENT) |
29 |
ECV (+) |
||
|
6 |
Mode Actuator (DEF) |
30 |
ECV (-) |
||
|
7 |
Mode Actuator (F/B) |
31 |
Photo Sensor left (-) |
||
|
8 |
Intake Actuator (REC) |
32 |
Photo Sensor right (-) |
||
|
9 |
Intake Actuator (FRE) |
33 |
HTD |
||
|
10 |
Intake Actuator (F/B) |
34 |
Rear Defog S/W |
||
|
11 |
Temp Actuator DR (COOL) |
35 |
K ŌĆō Line |
||
|
12 |
Temp Actuator DR (WARM) |
36 |
- |
||
|
13 |
Temp Actuator DR (F/B) |
37 |
- |
||
|
14 |
Temp Actuator PS (COOL) |
38 |
- |
||
|
15 |
Temp Actuator PS (WARM) |
39 |
- |
||
|
16 |
Temp Actuator PS (F/B) |
40 |
GND |
||
|
17 |
C_Can HIGH |
Connector(B) |
1 |
GND |
|
|
18 |
C_Can LOW |
2 |
IGN2 |
||
|
19 |
Detent OUT(-) Signal |
3 |
Blower Motor (+) |
||
|
20 |
Rheostat |
4 |
GND |
||
|
21 |
Ion Signal |
5 |
FET (GATE) |
||
|
22 |
Clean Signal |
6 |
FET (DRAIN F/B) |
||
|
23 |
Ionizer Diagnosis |
7 |
IGN1 |
||
|
24 |
- |
8 |
Battery |
 Heater & A/C Control Unit(Manual). Repair procedures
Replacement
1.
Disconnect the negative (-) battery
terminal.
2.
Using the screwdriver, remove
the side cover (A).
3.
Loosen the mounting scre ...

See also:
Removal
Timing chain cover removal is not required for this procedure.
ŌĆó
Use fender covers to
avoid damaging painted surf ...
Inspection
1.
Connect the GDS on the Data Link Connector (DLC).
2.
Measure the output voltage of the FTPS.
Specification:
Refer to "Specification"
...
Good driving practices
Never move the shift lever from P (Park) or N (Neutral) to any other position
with the accelerator pedal depressed.
Never move the shift lever into P (Park) when the vehicle is in motion.
Be ...
Categories
Kia Optima Manuals
- Kia Optima DL3 2019-2026 Owners Manual
- Kia Optima DL3 2019-2026 Service and Repair Manual
- Kia Optima TF 2011-{2019} Owners Manual
- Kia Optima TF 2011-2026 Service Manual
- Kia Optima MS/Magentis 2000-2005 Owners Manual

Copyright ® www.kiopman.com 2026