 Kia Optima: Inspection
| 3. |
Emit intensive light toward photo
sensor using a lamp, and check the output voltage change. |
| 4. |
The voltage will rise with higher
intensive light and reduce with lower intensive light.
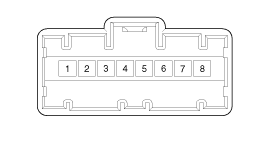
1. Auto Light Signal
2. Auto Light Signal Signal
3. Photo Signal (RH)
4. Led power (BAT)
|
5. Led GND (To BCM)
6. Photo Signal (LH)
7. Photo Power (SW)
8. 5V (Vcc)
|
|
1.
Disconnect the negative (-) battery
terminal.
2.
With the (-) driver, remove the
photo sensor (A) from the center of defrost nozzle.
3.
Ins ...
See also:
Inspection
Connecting Rod
1.
Check the connecting rod end
play.Using a feeler gauge, measure the end play while moving the connecting
rod back and forth.
End play :Standard : 0.10~ ...
Variant coding
After replacing the SRSCM with a new one, the “Variant Coding” procedure must be
performed.
1.
On SRSCM variant codi ...
Circuit Diagram - ESC (3)
...


 Replacement