 Kia Optima: Adjustment After Headlight Assembly Replacement
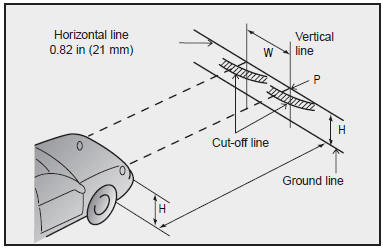
If the vehicle has had front body repair and the headlight assembly has been replaced, the headlight aiming should be checked using the aiming screen as shown in the illustration. Turn on the headlight switch. (Low Beam Position)
1. Adjust headlights so that main axis of light is parallel to center line of the body and is aligned with point ŌĆ£PŌĆØ shown in the illustration.
2. Dotted lines in the illustration show center of headlights.
ŌĆ£HŌĆØ;
Horizontal center line of headlights from ground : 24.72 in (628 mm)
ŌĆ£WŌĆØ;
Distance between each headlight center:
49.17 in (1,306 mm)
ŌĆ£LŌĆØ;
Distance between the headlights and the wall that the lights are tested against:
118.11 in (3,000 mm)
 Headlight Aiming Adjustment
Before performing aiming adjustment, make sure of the following.
1. Keep all tires inflated to the correct pressure.
2. Place the vehicle on level ground and press the front bumper & rear bump ...
 Specifications
The specifications given here are for general information only. Please check
with an authorized Kia dealer for more precise and more up-to-date information.
DIMENSIONS Unit: in (mm)
WEIGHTS
Ref ...
See also:
Description and Operation
Description
System OverviewThe System offers the following features:
-
Human machine interface through
a 1-stage button, for terminal switching and engine start.
-
Co ...
Camshaft. Repair procedures
...
Temperature Control Knob
The temperature control knob is the round knob closest to the passenger side
of the ventilation control panel. To change the air temperature in the passenger
compartment, turn the knob either cloc ...
Categories
Kia Optima Manuals
- Kia Optima DL3 2019-2026 Owners Manual
- Kia Optima DL3 2019-2026 Service and Repair Manual
- Kia Optima TF 2011-{2019} Owners Manual
- Kia Optima TF 2011-2026 Service Manual
- Kia Optima MS/Magentis 2000-2005 Owners Manual
