 Kia Optima: Replacement (With EPB)
Rear brake pads
| 1. |
Remove the rear wheel & tire. |
| 2. |
Connect the GDS to the data link
connector located underneath the dash panel. |
| 3. |
Ignition "ON" & Engine "OFF". |
| 4. |
Release the electric parking
brake. |
| 5. |
Select vehicle name and EPB system. |
| 6. |
Select the УPAD change mode (Before
pad change)Ф.

|
| 7. |
Perform the " PAD change mode
(Before pad change)" procedure with GDS.

|
When disengaging while the motor is in operation, be sure to press
down on the brake pedal. |
|
| 9. |
Disconnect the electric parking
brake actuator connector (A).

|
| 10. |
Loosen the guide rod bolts (B)
and then remove caliper body (A).

|
| 11. |
Replace pad retainers (C) and
brake pads (B) in the caliper carrier (A).

|
| 12. |
Use a SST (09581-11000) when
installing the brake caliper assembly.

|
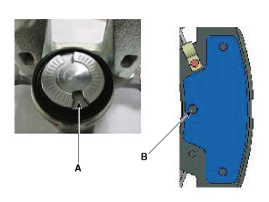
Make sure that the piston groove (B) is rotated 10∞ and faces the
marking (A) on the housing as shown in the diagram.

|
|
| 13. |
Place the caliper body (A) on
the caliper carrier and tighten the guide rod bolts (B).
Tightening torque:
21.6 ~ 31.4 N.m (2.2 ~ 3.2 kgf.m, 15.9 ~ 23.1 lb-ft)
|

|
Assemble the caliper body so that the piston groove (A) is in-line
with the pad center lobe (B).

* Make sure that the piston and pad are tightly attached. |
|
| 14. |
Connect the electric parking
brake actuator connector (A).

|
| 16. |
Select the УPAD change mode (Before
pad change)Ф.

|
| 17. |
Perform the " PAD change mode
(Before pad change)" procedure with GDS.

| 1. |
Check that the
parking brake operates normally. |
|
|
When you activate the EPB for the first time after you change the
brake pad, be sure to press down on the brake pedal. |
|
| 18. |
IGN switch УOFFФ and remove the
GDS. |
| 19. |
Install the rear wheel & tire.
Tightening torque:
88.3 ~ 107.9 N.m (9.0 ~ 11.0 kgf.m, 65.1 ~ 79.6 lb-ft)
|
|
Rear brake pads
1.
Loosen the guide rod bolt (B)
and pivot the caliper (A) up out of the way.
Tightening torque:21.6
~ 31.4 N.m (2.2 ~ 3.2 kgf.m, 15.9 ~ 23.1 lb-ft)
...
Rear Brake Disc Thickness Check
1.
Check the brake pads for wear
and fade.
2.
Check the brake disc for damage
and cracks.
3.
Remove all rust and contam ...
See also:
Inspection (With GDS)
1.
Check BCM input/output specification
of multifunction switch using the GDS. If the specification is abnormal,
replace the lamp or wiper switch.
2.
If diagnosis is ...
Components(1)
1. Front bumper cover
2. Front bumper upper strip assembly
3. Radiator grill upper cover
4. Front bumper lower stiffner
5. Front bumper rail assembly
6. Front bum ...
Inspection
1.
Ignition "ON".
2.
Turn on the head lamp switch.
3.
Check for operation. If the aim
of the head lamps changes smoothly when the head lamp leve ...
 Kia Optima: Replacement (With EPB)
 Replacement (Without EPB)
 Inspection


