 Kia Optima: Removal
| 1. | Loosen the windshield wiper arm
nut (B) after removing a wiper cap (A).
|

| 2. | Remove the windshield wiper arm
and blade (A).
|

| 3. | If necessary, release the wiper
blade fixing clip by pulling up and remove the wiper blade from the inside
radius of wiper arm.
|

| 4. | Disconnect the washer hose (A)
connected to cowl top cover.
|

| 5. | Remove the weather strip and
the cowl top cover (A) after removing rivets.
|

| 6. | Disconnect the wiper motor connector
(A) from the wiper motor & linkage assembly.
|

| 7. | Remove the windshield wiper motor
and linkage assembly (A) after removing 3 bolts.
|

| 8. | Hold the wiper motor crank arm
and remove the upper linkage (A) from the wiper motor crank arm.
|

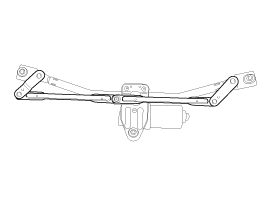
| 9. | Remove the lower linkage (A)
from the wiper motor crank arm.
|

| 10. | Remove the crank arm (A) after
loosening a nut.
|

| 11. | Remove the wiper motor bracket
(A) after loosening the bolts.
|


 Installation
1.
Install the wiper motor.
2.
Install the crank arm.
Tighting torque:24.5 ~
26.4Nm (2.5 ~ 2.7, kgf.m, 18.0 ~ 19.5 lbf.ft)
...
See also:
Kia Optima TF 2011-2024 Owners Manual
h4 {color:#800000}
h3 {color:#0033CC}
h2 {color:#008000}
h1 {color:#FF0000}
...
Inhibitor Switch. Schematic Diagrams
Circuit Diagram
...
Disassembly
1.
Remove the snap ring (A).
2.
Remove the hub assembly from
the knuckle assembly.
(1)
Install the front knuckle
assembly (A) on press.
...
Copyright © www.kiopman.com 2024