 Kia Optima: Removal
Parking Brake Pedal [Foot type]
| 1. |
Turn ignition OFF and disconnect
the negative (-) battery cable. |
| 2. |
Remove the crash pad lower panel
and reinforcing panel. (Refer to the Body group-crash pad) |
| 3. |
Remove the junction box. (Refer
to the Body Electrical System group - Fuses and Relays) |
| 4. |
Disconnect the parking brake
switch connector (A).

|
| 5. |
Remove the parking brake cable
mounting nut (A).
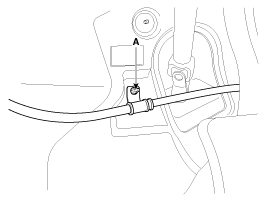
|
| 6. |
Remove the parking brake pedal
mounting bolts (A) and nuts (B).
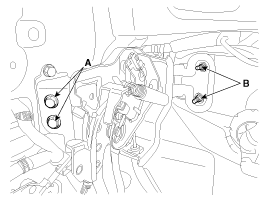
|
| 7. |
Remove the parking brake cable
adjusting nut (A) and the fixing clip (B), and then remove the parking brake
pedal.

|
| 8. |
Remove the floor console. (Refer
to the Body group - Console) |
| 9. |
Remove the shift lever assembly.
(Refer to the Automatic Transaxle group - shift lever) |
| 10. |
Remove the paring brake cable
(B) after removing the cable retainer (A).

|
| 11. |
Remove the parking brake cable
fixing clip (A) and bolts (B). And then remove the front parking brake cable.
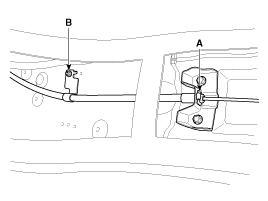
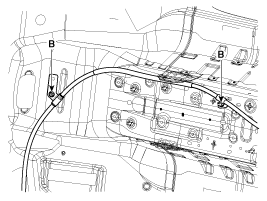
|
| 12. |
Raise the vehicle, and make sure
it is securely supported. |
| 13. |
Remove the parking brake cable
(B) after removing the fixing clip (A).

|
| 14. |
Loosen the parking brake cable
bracket bolts and remove the rear parking brake cable. |
Parking Brake Lever [Hand type]
| 1. |
Remove the floor console. (Refer
to the Body group - Console) |
| 2. |
Disconnect the parking brake
switch connector (A).
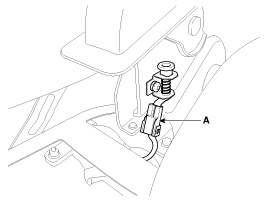
|
| 3. |
Remove the parking brake cable
(B) after removing the cable retainer (A).

|
| 4. |
Remove the parking brake lever
assembly after removing the bolts (A) as shown below.

|
| 5. |
Raise the vehicle and make sure
it is securely supported. |
| 6. |
Remove the rear wheel & tire.
Tightening torque:88.3
~ 107.9 N.m (9.0 ~ 11.0 kgf.m, 65.1 ~ 79.6 lb-ft)
|
|
| 7. |
Remove the parking brake cable
(B) after removing the fixing clip (A).
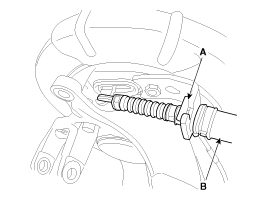
|
| 8. |
Loosen the parking brake cable
braket bolts and remove the parking brake cable. |
Parking Brake Shoe
| 1. |
Raise the vehicle, and make sure
it is securely supported. |
| 2. |
Remove the rear tire and wheel. |
| 3. |
Remove the rear brake caliper
and Rear disc brake.
(Refer to "Rear disc brake removal")
|
| 4. |
Remove the parking brake cable
(B), after removing the fixing clip (A).

|
| 5. |
Loosen the hub assembly mounting
bolts (A), and then remove the hub assembly and parking brake assembly.

|
| 6. |
Remove the adjuster assembly
(B) and the lower return spring (A).

|
| 7. |
Remove the upper return spring
(C) operating lever assembly (D).

|
| 8. |
Remove the shoe hold down pin
(A) and the spring (B) by pressing and rotating the spring.

|
| 9. |
Remove the brake shoes (C). |
Parking Brake Shoe
1.
Install the shoe hold down pin
(A) and spring (B) by pressing and rotating the spring.
2.
Install the operating lever assembly
(D) and th ...
 Kia Optima: Removal
 Installation


