 Kia Optima: Head Lamp Aiming Instructions
| <Mechanical aiming> |
|
| 1. | Inflate the tires to the specified pressure and remove any loads from the vehicle except the driver, spare tire, and tools. |
| 2. | The vehicle should be placed on a flat floor. |
| 3. | Draw vertical lines (Vertical lines passing through respective head lamp centers) and a horizontal line (Horizontal line passing through center of head lamps) on the screen. |
| 4. | With the head lamp and battery
in normal condition, aim the head lamps so the brightest portion falls on
the horizontal and vertical lines. A : Horizontal (HI & LOW)
|

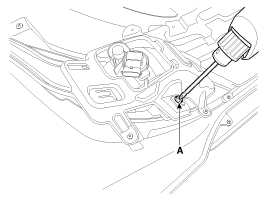
The front fog lamps should be aimed as the same manner of the head lamps aiming.
With the front fog lamps and battery normal condition, aim the front fog lamps by turning the adjusting screw (A) with a driver.


| 1. | Head Lamp (Low beam)
|

| 2. | Turn the front fog lamp on without
the driver aboard. The cut-off line should be projected in the allowable range (shaded region)
|

 Installation
1.
Install the head lamp bulbs.
2.
Connect the connectors.
3.
Install the head lamp bolts (2EA).
4.
Connect the negative (-) battery
termi ...
 Replacement
Head Lamp (Low)
[General type]
1.
Turn the head lamp switch off.
2.
Disconnect the power connector
from the lamp.
3.
Remove the head lamp (Low ...
See also:
Installation
1.
Installation is the reverse order of removal.
...
Rear Seat Belt. Repair procedures
Replacement
Rear Seat Belt Replacement
•
When installing the belt,
make sure not to damage the retractor.
...
Interior overview
1. Driver position memory system* 2. Door lock/unlock button 3. Outside rearview
mirror control switch* 4. Power window lock button* 5. Power window switches*
6. Central door lock switch* 7. Ins ...
Copyright © www.kiopman.com 2024