 Kia Optima: Component (1)
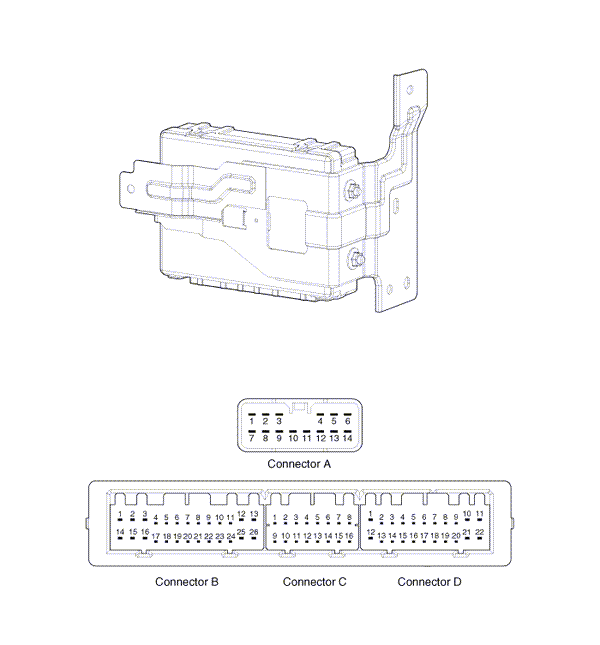
|
No |
Connector A (14P) |
No |
Connector B (26P) |
||
|
1 |
GND 1 |
1 |
- |
15 |
L_assist lock button, |
|
L_assist toggle button |
|||||
|
2 |
A_ACC |
2 |
L_driver lock button, |
16 |
- |
|
L_driver toggle button |
|||||
|
3 |
A_IGN2 |
3 |
- |
17 |
- |
|
4 |
A_IGN1 |
4 |
- |
18 |
- |
|
5 |
VBAT_CPU |
5 |
- |
19 |
L_fob input |
|
6 |
VBAT_LOAD |
6 |
L_SSB_switch1 |
20 |
F_RPM |
|
7 |
GND 2 |
7 |
F_wheel speed |
21 |
L_Start feedback |
|
8 |
- |
8 |
L_SSB_switch2 |
22 |
- |
|
9 |
O_exteriror buzzer |
9 |
- |
23 |
- |
|
10 |
O_ACC relay |
10 |
- |
24 |
- |
|
11 |
O_IGN1 relay |
11 |
- |
25 |
- |
|
12 |
O_IGN2 relay |
12 |
B_CAN_H |
26 |
- |
|
13 |
O_starter relay |
13 |
B_CAN_L |
|
|
|
14 |
- |
14 |
- |
||
|
No |
Connector C (16P) |
No |
Connector D (22P) |
|
1 |
C_CAN_L |
1 |
immobilizer warning |
|
2 |
C_CAN_H |
2 |
O_SSB_LED_amber |
|
3 |
- |
3 |
O_SSB_illumination power |
|
4 |
O_holder illumination |
4 |
O_interior antenna 2 GND |
|
5 |
- |
5 |
O_interior antenna 1 GND |
|
6 |
Diagnostic K |
6 |
- |
|
7 |
L_brake switch |
7 |
- |
|
8 |
Immobilizer data |
8 |
O_interior antenna 3 power |
|
9 |
RF_COM |
9 |
O_bumper antenna power |
|
10 |
EMS_COM |
10 |
O_assist side antenna power |
|
11 |
- |
11 |
O_driver side antenna power |
|
12 |
- |
12 |
- |
|
13 |
L_stop lamp fuse |
13 |
O_SSB_LED_blue |
|
14 |
- |
14 |
O_SSB_illumination GND |
|
15 |
L_P position, L_clutch switch |
15 |
O_interior antenna 2 power |
|
16 |
Immobilizer clock signal |
16 |
O_interior antenna 1 power |
|
|
|
17 |
- |
|
18 |
- |
||
|
19 |
O_interior antenna 3 GND |
||
|
20 |
O_bumper antenna GND |
||
|
21 |
O_assist side antenna GND |
||
|
22 |
O_driver side antenna GND |

 Component (2)
...
See also:
Flashing Headlights
To flash the headlights, pull the lever toward you. It will return to the normal
position when released. The headlight switch does not need to be on to use this
flashing feature. ...
Driving at night
Because night driving presents more hazards than driving in the daylight, here
are some important tips to remember:
Slow down and keep more distance between you and other vehicles, as it
ma ...
Inspection
1.
Ignition "OFF"
2.
Disconnect the connector of temperature
control actuator.
3.
Verify that the temperature control
actuator operates to t ...
Copyright © www.kiopman.com 2024